


3
Introduction
This instruction manual is intended to assist those involved
with the installation, operation and maintenance of Eagle
Model A100 pumps. It is recommended that this manual be
thoroughly reviewed prior to installing or performing any work
on the pump or motor.
I-A. Importance of Instructions
The design, material and workmanship incorporated in the
construction of Eagle pumps make them capable of giving
long, trouble–free service. The life and satisfactory service of
any mechanical unit, however, is enhanced and extended by
periodic inspection and careful maintenance. This instruction
manual was prepared to assist operators in understanding the
construction and correct methods of installing, operating, and
maintaining these pumps.
Study thoroughly Sections I, II, III, and carefully follow the
instructions for installation and operation. Sections IV, V, VI,
VII, and VIII are answers to trouble and maintenance questions.
Keep this instruction manual handy for reference.
I-B. Special Warnings
Eagle Pump and Compressor will not be liable for any damages
or delay caused by failure to comply with the provisions of this
instruction manual. This pump is not to be operated at speeds,
working pressures, discharge pressures, or temperatures higher
than nor used with liquids other than originally intended for,
without written permission of Eagle Pump.
I-C. Receiving Inspection—Shortages
Care should be taken when unloading pumps. If shipment is
not delivered in good order and in accordance with the Bill–of–
Lading, note the damage or shortage on both receipt and freight
bill. MAKE ANY CLAIMS TO THE TRANSPORTATION
COMPANY PROMPTLY.
SECTION I—GENERAL
Instruction sheets on various components as well as the
Instruction Book for the pump are included in the shipment.
DO NOT DISCARD!
I-D. Preservation and Storage
Eagle’s normal domestic shipping and storage preparation is
suitable for protecting the pump during shipment in covered
trucks. It also provides protection during covered storage at the
jobsite, and for a short period between installation and start-up.
If the pump is to be idle and exposed to the elements for
an extended period, either before or after installation, special
precautions are required. One approach is to provide special
preservatives and wrapping before shipment. However, after
installation the protective wrappings will have been removed.
Therefore, application of preservatives after installation is
considered a good practice.
The driver, coupling, and mechanical seal manufacturers should
be contacted for their recommendations on preservation and
protection procedures.
I-E. Handling Techniques
Care should be used in moving pumps. Pumps should not be
hoisted by eyebolts. These eyebolts are intended for removing
the back pull–out assembly for maintenance and inspection. An
assembled pump should be hoisted using a sling under suction
flange and under rear of bearing frame. Bedplate mounted units
should be hoisted using slings under bedplate below both pump
and driver.
II-A. Location
Pumping unit should be placed as close as practical to the
source of supply. Floor space and headroom allotted to the unit
must be sufficient for inspection and maintenance. Be sure to
allow for crane or hoist service.
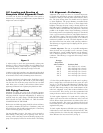
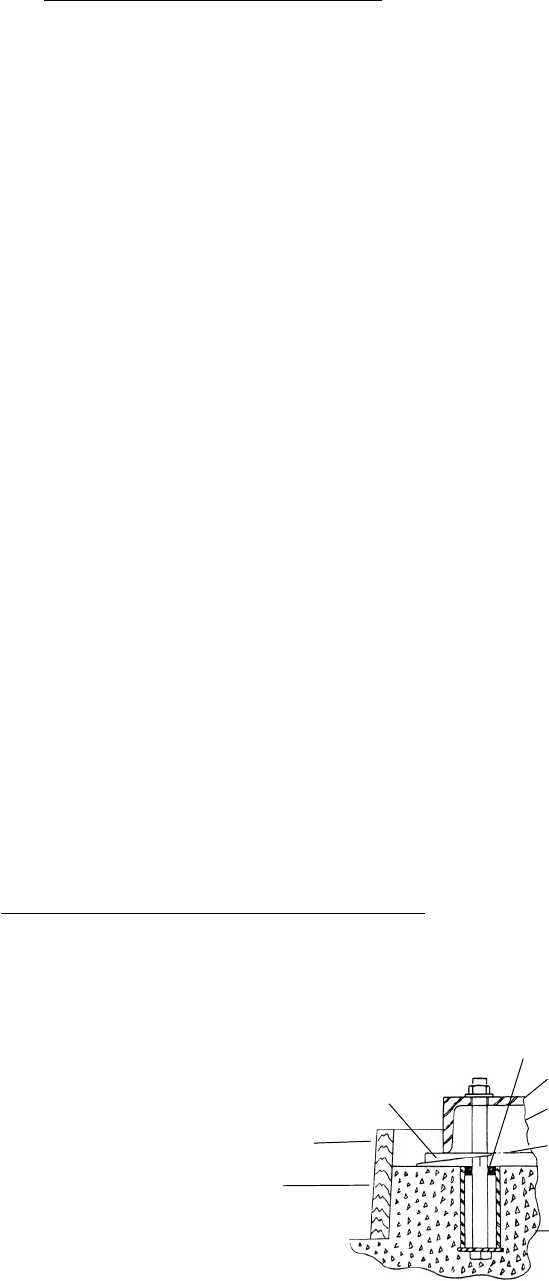
II-B. Foundations
1. Grouted—Bedplate mounted units are normally grouted–in
on a concrete foundation, which has been poured on a solid
footing. This allows a permanent, vibration–absorbing base for
the unit. The location and size of foundation bolts are shown
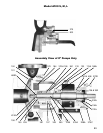
on the outline assembly drawings supplied for the unit. Fig. 1
illustrates a typical foundation bolt installation.
2. Flexibly Mounted—Installation and leveling of the optional
flexibly mounted bedplate should be carried out in accordance
with assembly drawings supplied in the data package for the
unit.
SECTION II—INSTALLATION
Figure 1
LEAVE 3/4" TO11/2" UNDER
BEDPLATE FOR GROUT
WEDGES
DAM
WASTE
BEDPLATE
GROUT
LEAVE TOP OF
FOUNDATION ROUGH,
AND WET BEFORE
GROUTING.
CONCRETE
FOUNDATION