EXCEL-FIRE GAS STOVE 7
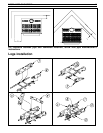
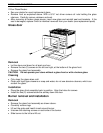
1. Remove the two door retaining screws at the bottom right and left of the door.
2. Remove the door.
3. Locate the log grate in the retainers in the right and left rear corners.
4. Place the rear log (1) against the rear log stop. Make sure grooves at the back of the log line
up with the grates log stop.
5. Place logs 2 and 3 against the stops in the middle of the grate. Again see that grooves in the
the logs line up with the grates log stop.
6. Place log 4 into the grooves of logs 1 and 2.
7. Log 5 sits over log 4 and 3.
Rock wool fiber installation
One small plastic bag is supplied with your unit its filled with rock wool fiber which, when glowing
red, resembles hot embers.
• Place rock wool fiber on top of the front gas ports and up to the grates middle section.
• Put the door back in place. Install the two door retaing screws.
Optional 6-inch pipe installation
Instead of using a standard B-vent pipe it is possible to use a 4" flexible aluminum chimney lining
system into an existing chimney. The existing chimney must be a code complying masonry or
listed fuel burning chimney system: ‘B’ vent, ‘L’ vent UL103 or ULC S629. Refer to the installation
standards in your area or CAN/CGA B-149 AND ANSI Z223-1 standards (under "venting systems")
and instruction of flexible pipe manufacturer.
Warning: always use an approved gas pipe. Never use a conventional 6-inch pipe alone.
• Install the first 4-inch B-vent section or flexible aluminum chimney liner.
• Fasten the optional 6-inch collar adapter to the stove with the two (2) screws supplied.
• Install the sections of the conventional 6-inch pipe. Over the flexible liner. That you want to
cover up.
OPERATION INSTRUCTIONS
Wall thermostat
The optional wall thermostat will automatically keep your room at an even temperature. You need
to choose a convenient location for the thermostat. Remember that it should be at least 10 feet
from the stove and away from direct radiation of the fire. Run the correct gauge wire (see table)
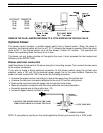
from the valve to the thermostat and wire as shown in the diagram.(on next page)
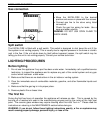
To operate your EXCEL-FIRE using the wall thermostat, follow the lighting procedure and set the
gas control to the ON position. Simply set your wall thermostat to a comfortable temperature and
the stove will do the rest.
During the heating season, you do not have to touch the gas control valve. If you would like the
stove off for a while, just set the thermostat to its minimum setting. However if you do not need
the stove for quite some time, follow the procedure outlined in the SHUTDOWN section. This will
extinguish the pilot light as well.


