


4
OPERATING INSTRUCTIONS
1. Adding More Water To Toilet Bowl
Raise the flush handle until the desired water level is attained. To prevent overflowing the toilet, a timer inside the
control module limits the amount of water that can be added.
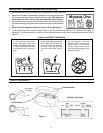
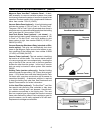
2. Flushing The Toilet
When the vacuum status panel’s green “OK to Flush” light is on, and the red “Do Not Flush” light is off, push the
handle down for a moment then release it. Holding the handle down will not prolong the flush cycle nor start a
new flush cycle. The handle must be allowed to return to the “off” position and the vacuum must be allowed to
recharge before another flush cycle can be initiated. A full holding tank will also prevent the toilet from flushing.
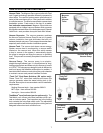
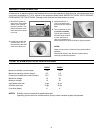
3. Selecting Automatic Water Refill Levels:
The Water Level switch is located under the access cover. Carefully lift up on the front of the cover to access the
Water Level switch. There are three water refill levels available. The microprocessor-controlled water valve will
refill the toilet bowl according to your water level selection.
To reinstall the access cover, set the cover on top of the toilet and press down. This will lock the cover in place
and prevent it from coming loose during travel.
LOW Level
Use this setting to conserve water. This position may be desirable to reduce the chance of water splashing out
of the bowl during rough travel. If more water is needed for flushing, lift up on the flush handle. Water flow will
stop after nine seconds to prevent overflow.
MID Level
Use this position to keep the toilet bowl clean, especially when family and friends may be using the toilet. If
more water is still needed for flushing, raising the flush handle will provide up to six seconds of additional water
refill time.
HIGH Level
Use this position if the MID level does not provide a clean toilet bowl. This position is not recommended while
underway. If more water is still desirable for flushing, raising the flush handle will provide up to three seconds
of additional water refill time.
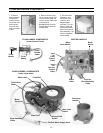
4. Mode Switch
The Mode switch is located on the right side of the control module. It lets you switch between three function set-
tings:
NORMAL
Use this setting for flushing the toilet.
SERVICE
Use this position for cleaning the toilet bowl and flush ball seal. The flush ball will open automatically and remain
open in this position. Lifting up the flush handle provides water.
MANUAL OVERRIDE
Use this position to flush the toilet manually in the event of power or battery failure. This switch disconnects the
electronic brake in the flush valve motor, and allows manual flushing via the override access hole in the side
of the vitreous china base.
Note: The control module allows 15 seconds of water for cleaning. If more water is required, return
the switch to the NORMAL position then back to the SERVICE position.
A safety circuit in the control module monitors flush ball operation. If foreign objects or low voltage prevent the
flush ball from closing, this circuit prevents personal injury or damage to the flush valve motor. If this condi-
tion occurs, reset the control module by placing the Mode switch into the SERVICE position temporarily, then
returning it to the NORMAL position.