


www.desatech.com
116239-01D36
TROUBLESHOOTING
Continued
-
1. Gas leak.
1. High or gusting winds
2. Low line pressure
3. Pilot is partially clogged
4. Inner vent pipe leaking
exhaust gasses into system
5. Glass too loose and air tight
gasket leaks in corners after
usage
6. Bad thermopile or thermo-
couple
7. Improper vent cap installa-
tion
1. Gas leak.
2. Control valve defective
1. Gas leak.
1. Air holes at burner inlet
blocked
2. Burner ame holes blocked
3. Improper venting or exces-
sive blockage
4. Excessive amounts of em-
bers and pan material
Fireplace produces unwanted
odors
Fireplace shuts off in use
Gas odor even when control
knob is in OFF position
Gas odor during combustion
Dark residue on logs or inside
of replace
REMEDY
1. Locate and correct all leaks (see
Checking Gas Connections,
page 23)
1. Fireplace has been tested for up to
40mph winds. However, extreme
conditions may occur. See Lighting
Instructions on page 27
2. Contact local propane/LP or natu-
ral gas company
3. Clean pilot (see Cleaning and
Maintenance, page 31)
4. Locate and correct all leaks (see
Checking Gas Connections,
page 23)
5. Tighten glass
6. Replace faulty component
7. Check for proper installation and
freedom from debris or blockage
1. Locate and correct all leaks (see
Checking Gas Connections,
page 23)
2. Replace control valve
1. Locate and correct all leaks (see
Checking Gas Connections,
page 23)
1. Clean out air holes at burner inlets.
Periodically repeat as needed
2. Remove blockage or replace
burner
3. Have the vent system inspected,
including the termination cap.
Remove any restrictions or
obstruction
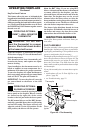
4. Clear excess embers until a mini-
mum gap of 1/2" remains under
the grate