www.desatech.com
119505-01E 7
are integrally attached. If standoff spacers
are attached to your rebox, these spacers
can be placed directly against wall or fram-
ing materials.
Use the dimensions shown for rough openings
to create the easiest installation (see Built-In
Firebox Installation, page 10).
INSTALLATION CLEARANCES
WARNING: Maintain the
Carefully follow the instructions below. This
will ensure safe installation.
Minimum Clearances For Side
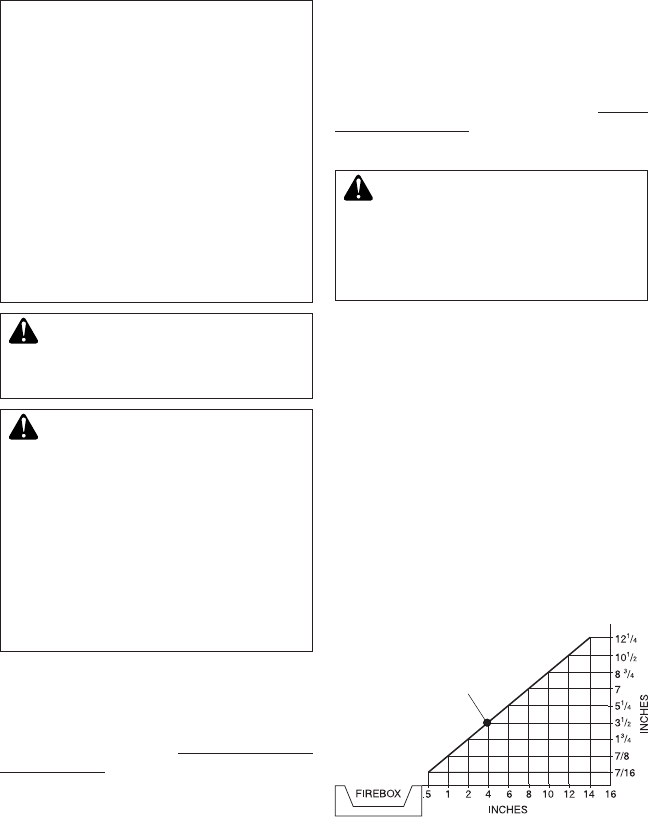
A. Clearances from side of replace cabinet
to any combustible material and wall
should follow diagram in Figure 6.
Example: The face of a mantel, bookshelf,
etc. is made of combustible material and
protrudes 3
1
/
2
" from the wall. This com-
bustible material must be 4" from side of
replace opening (see Figure 6).
B. Clearances from top of replace opening
to ceiling should not be less than 42".
INSTALLATION
Figure 6 - Minimum Clearance for
Combustible to Wall
*Minimum 16" from Side Wall
*
Example
NOTICE: This heater is intended
-
-
WARNING: Never install the
IMPORTANT: Vent-free gas log heaters add
moisture to the air. Although this is benecial,
installing rebox in rooms without enough
ventilation air may cause mildew to form from
too much moisture. See Air for Combustion
and Ventilation, page 4.
IMPORTANT: Make sure the rebox is level.
If rebox is not level, log set will not work
properly.
Note: Your rebox is designed to be used in
zero clearance installations. Wall or framing
material can be placed directly against any
exterior surface on the rear, sides or top of
your rebox, except where standoff spacers


