


www.desatech.com
111044-01J6
ASSEMbLy
Continued
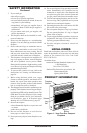
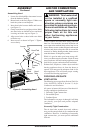
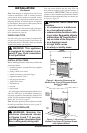
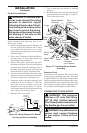
Figure 3 - Assembling Hood
Hood Tab
Sheet
Metal
Screws
Louver
Bafe
Firebox
Top
Hood
Hood
Tabs
AIR FOR COMbUSTION
AND VENTILATION
WARNING: This heater shall
-
-
Today’s homes are built more energy efficient
than ever. New materials, increased insulation and
new construction methods help reduce heat loss in
homes. Home owners weather strip and caulk around
windows and doors to keep the cold air out and the
warm air in. During heating months, home owners
want their homes as airtight as possible.
While it is good to make your home energy ef-
cient, your home needs to breathe. Fresh air must
enter your home. All fuel-burning appliances need
fresh air for proper combustion and ventilation.
Exhaust fans, replaces, clothes dryers and fuel
burning appliances draw air from the house to
operate. You must provide adequate fresh air for
these appliances. This will insure proper venting
of vented fuel-burning appliances.
The following are excerpts from National Fuel Gas
Code, ANSI Z223.1/NFPA 54, Section 5.3, Air for
Combustion and Ventilation.
All spaces in homes fall into one of the three fol-
lowing ventilation classications:
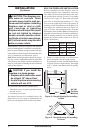
1. Unusually Tight Construction
2. Unconned Space
3. Conned Space
The information on pages 6 through 8 will help
you classify your space and provide adequate
ventilation.
The air that leaks around doors and windows
may provide enough fresh air for combustion and
ventilation. However, in buildings of unusually
tight construction, you must provide additional
fresh air.
1. Locate four black phillips sheet metal screws
from the hardware packet.
2. Rotate hood as shown in Figure 3. Make sure
hood tabs point toward replace.
3. Insert hood tabs between bafe and louvers
(see Figure 3).
4. Gently rotate hood to upright position. Make
sure hood tabs are behind louvers and hood
is resting on rebox top (see Figure 3).
5. Align screw holes on hood with screw holes
on rebox top.
6. Insert screws as shown in Figure 3. Tighten
screws rmly.