


33
replace cable.
8) Reinstall burners, being careful to put the pilot main burner in its original location.
9) Inspect all boiler wiring for loose connections or deterioration.
10) Inspect the vent system:
• Make sure that the vent system is free of obstructions.
• Make sure that all vent system supports are intact.
• Inspect joints for signs of condensate or flue gas leakage.
• Inspect venting components for corrosion or other deterioration. Replace any defective vent components.
11) Inspect the boiler and system for leaks.
12) Inspect the low water cut-off:
• For Hydrolevel CG400A low water cut-offs - Remove and inspect the probe for scale and sediment buildup. Clean any
sediment or scale from the probe with a scouring pad or steel wool. Consult the Hydrolevel CG400 manual for any
additional maintenance information. Test the low water cut-off before placing the boiler back into service.
• For McDonnell & Miller #67 low water cut-offs - Remove and inspect switch and float mechanism. Inspect float bowl
for mud accumulation. Clean as required. Replace the switch and float mechanism every five years or 100,000 cycles.
Consult the McDonnell and Miller #67 manual for any additional maintenance information. Test the low water cut-off
before placing the boiler back into service.
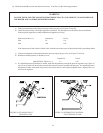
13) Allow the boiler to cool to room temperature. Remove the drain valve and 2 x 3/4 bushing on the left side of the boiler. Use
a flashlight to inspect the bottom row of pushnipples for accumulated scale or mud. If a significant amount is present, use the
following procedure to clean the inside of the heat exchanger:
a) Temporarily install a 1 1/4 inch or larger full port ball valve in place of the boiler drain. Temporarily pipe the outlet
of this valve to a location where hot water and steam can be safely discharged.
b) Make sure that this valve is closed and that the water level is at the normal water line.
c) If a king valve is present in the steam main takeoff, close it. Alternatively, temporarily replace enough of the
vents on the mains and/or radiators with plugs so that 2-5 psi can be developed when the boiler is fired.
d) Fire the boiler and allow it to steam until 2-5 psi is registered on the gauge.
e) Turn off the burners and immediately fully open the 1-1/4 valve.
f) Allow the boiler to blow down until either the water runs clear or the water level reaches the bottom of the gauge
glass.
g) Allow all parts of the boiler to cool to room temperature. Drain the boiler completely and remove the 1-1/4 valve.
h) If significant mud or scale is still present in the bottom of the boiler, repeat steps (b) through (g) until all mud or
scale is removed.
i) Once all mud or scale is removed, replace the 1-1/4 valve and temporary blow-down piping with the standard drain
valve. After all parts of the boiler are at room temperature, refill the boiler to the normal water line.
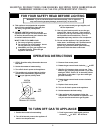
14) Place the boiler back in operation using the procedure outlined in “Start-up”. Check the pilot line and any other gas piping
32
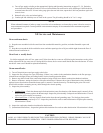
NOTE
A large accumulation of mud or scale in the bottom of the heat exchanger is usually a sign of excessive feedwater make-up.
Such accumulations can cause severe heat exchanger damage. If mud or scale accumulations are found:
• Make sure that all vents are in working order. Vents should not permit any passage of steam or water.
• Check all steam and return piping for leaks. Be aware that buried return piping can leak and go undetected
during normal operation.