


Assembly
TO AVOID INSTALLATION DIFFICULTIES, DO NOT RUN THE GARAGE DOOR OPENER UNTIL YOU ARE
INSTRUCTED TO DO SO.
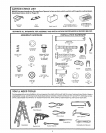
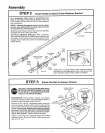
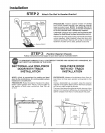
ST _: P "1 Assemble Tee Rail & Attach Cable Pulley Bracket
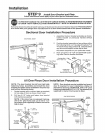
TEE RAIL BACK
(TO CHASSIS)
CAUTION: Do not tighten the lock nuts until bolt
necks are seated in square holes.
Tee Rail
(End Section)
t/4' Lock Nut
Tee Rail
The center rail section MUST be
positioned on the LEFTSIDE ofend
rails as shown,
Otherwise, trolley will hitagainst nut
when installed (Pg. 7).
Brace
Tee Rail
(End Section)
Square Carriage
Bolt Hole
Cable pulley bracket
attaches to FRONT
END of Tee Rail
TEE RAIL FRONT
(TO DOOR)
Carriage Bolt
/2"
Brace _
PROCEDURE: Place the 3 Tee rail sections on a flat
surface for assembly. THIS IS IMPORTANT. The end
sections are identical. THE CENTER SECTION MUST BE
POSITIONED WITH THE BRACES ON THE LEFT SIDE OF
END SECTIONS. If there is a label attached to the cen-
ter section, make sure that the "directional arrow" is
pointing toward the front (to door) Otherwise, study
the illustration CAREFULLY
(When assembled, Tee rail has a front-to-back posi-
tion as shown).
Bolt rail sections together with the hardware illus-
trated and from the direction indicated
SQUARE NECKS ON CARRIAGE BOLTS MUST BE
SEATED IN SQUARE HOLES IN RAIL SECTIONS,
Screws
_ _5/16"_18x7/8""
Cable Pulley _ _,_';
k°ckW_s--_her_l _ Nut
5/16"
5/16"
Position cable pulley bracket on front end of tee rail as
shown. Fasten securely with the hardware provided
IMPORTANT: Whentighteningscrews, besureto
keep bracket parallel to rail, Otherwise, rail may
bow when opener is operated.
6