


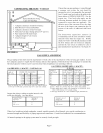
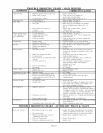
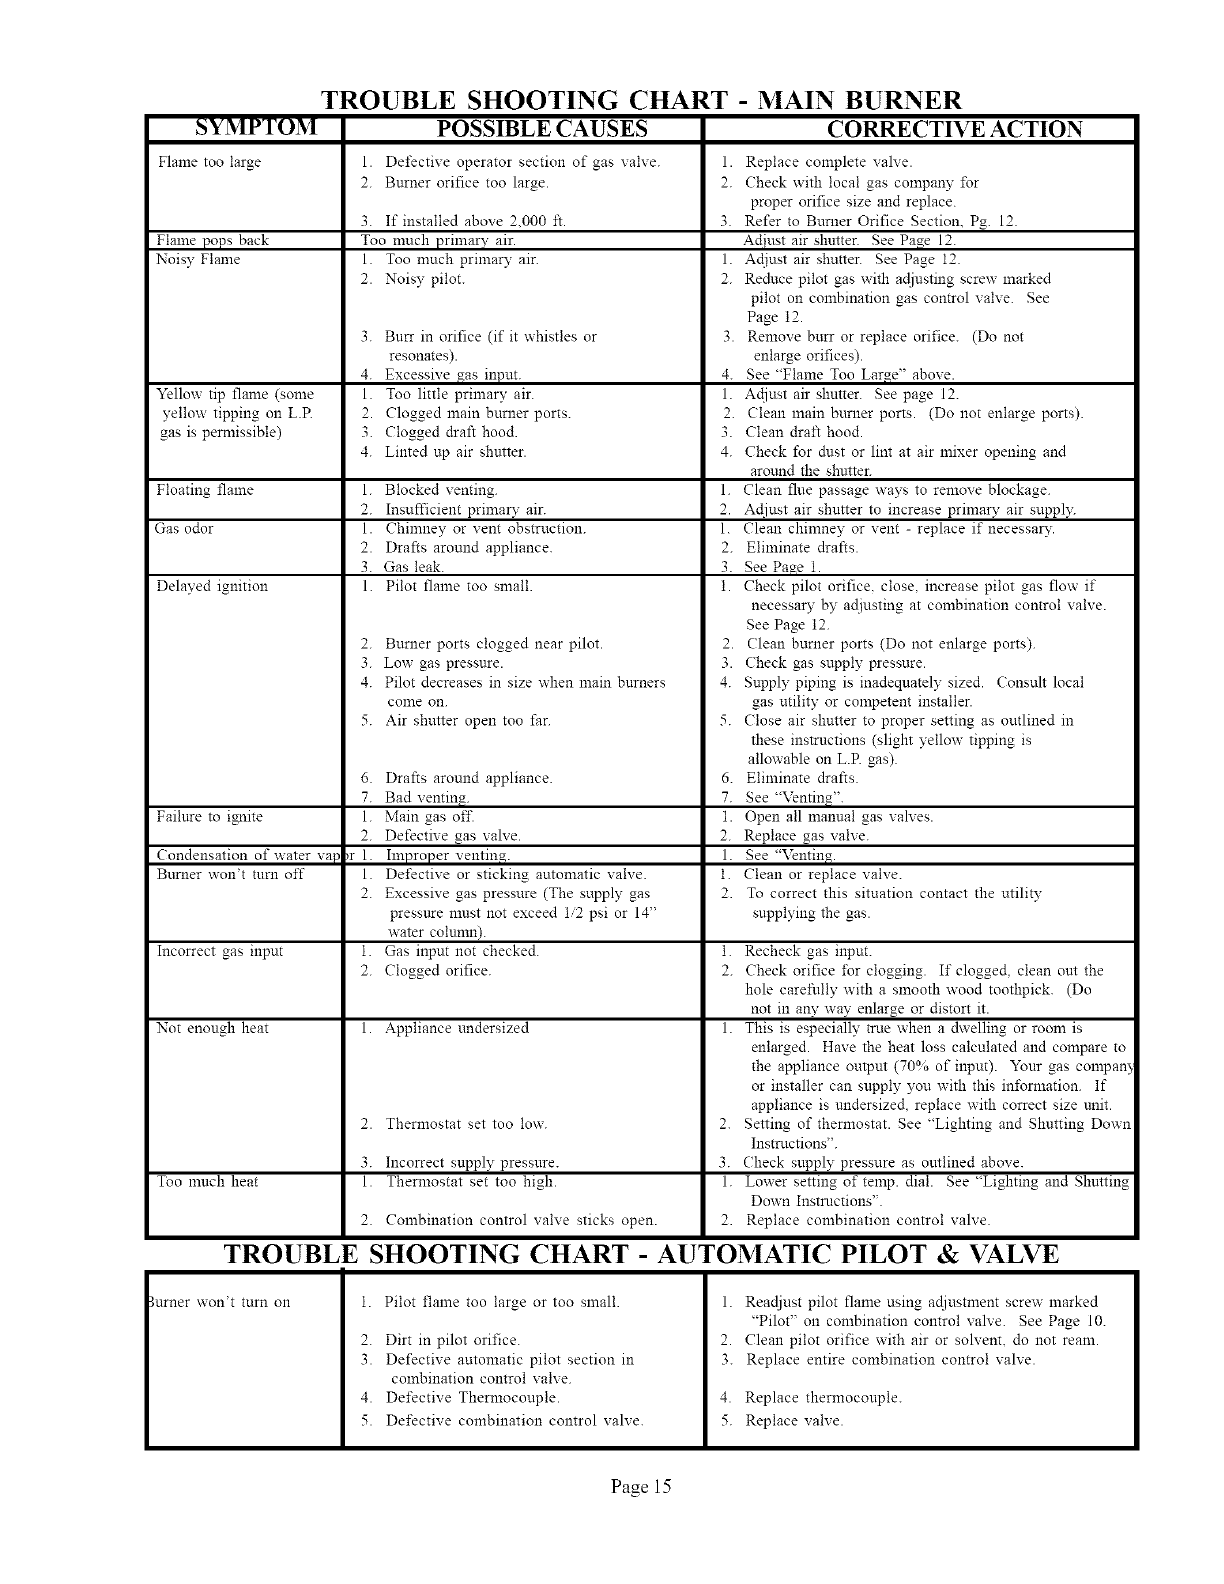
SYMPTOM
Flame too large
Flame pops back
Noisy Flame
Yellow tip flame (some
yellow tipping on L.R
gas is permissible)
Floating flame
Gas odor
Delayed ignition
Failure to ignite
Condensation of water va
Burner won't turn off
Incorrect gas input
Not enough heat 1. Appliance undersized
Too much heat
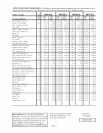
TROUBLE SHOOTING CHART
POSSIBLE CAUSES
1. Defective operator section of gas valve. 1.
2. Burner orifice too large. 2.
3. If installed above 2_000 it. 3.
Too much primary air.
1. Too much primary air. 1.
2. Noisy pilot. 2.
3. Burr in orifice (if it whistles or 3.
resonates).
4. Excessive gas input. 4.
1. Too little primary air. 1.
2. Clogged main burner ports. 2.
3. Clogged draft hood. 3.
4. Linted up air shutter. 4.
1. Blocked venting. 1.
2. Insufficient primal T air. 2.
1. Chimney or vent obstruction. 1.
2. Drafts around appliance. 2.
3. Gas leak. 3.
1. Pilot flame too small. 1.
2. Burner ports clogged near pilot. 2.
3. Low gas pressure. 3.
4. Pilot decreases in size when main burners 4.
come on.
5. Air shutter open too far. 5.
6. Drafts around appliance. 6.
7. Bad venting. 7.
1. Main gas off. 1.
2. Defective gas valve. 2.
_r 1. hnproper venting. 1.
1. Defective or sticking automatic valve. 1.
2. Excessive gas pressure (The supply gas 2.
pressure nmst not exceed 1/2 psi or 14"
water column).
1. Gas input not checked. 1.
2. Clogged orifice. 2.
1.
2. Thermostat set too low.
3. Incorrect supply pressure.
1. Thermostat set too high.
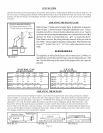
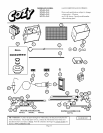
- MAIN BURNER
CORRECTIVE ACTION
Replace complete valve.
Check with local gas colnpany for
proper orifice size and replace.
Refer to Burner Orifice Sectiom Pg. 12.
Adiust air shutter. See Page 12.
Actiust air shutter. See Page 12.
Reduce pilot gas with adiusting screw marked
pilot on combination gas control valve. See
Page 12.
Remove burr or replace orifice. (Do not
enlarge orifices).
See "Flame Too Large" above.
Actiust air shutter. See page 12.
Clean main burner ports. (Do not enlarge ports).
Clean draft hood.
Check for dust or lint at air mixer opening and
around the shutter.
Clean flue passage ways to remove blockage.
Adjust air shutter to increase primal 3' air supply.
Clean chinmey or vent - replace if necessal T.
Eliminate drafts.
See Page 1.
Check pilot orifice, close, increase pilot gas flow if
necessal 3" by adiusting at combination control valve.
See Page 12.
(?lean burner ports (Do not enlarge ports).
Check gas supply pressure.
Supply piping is inadequately sized. Consult local
gas utility or competent installer.
Close air shutter to proper setting as outlined in
these instructions (slight yellow tipping is
allowable on L.R gas).
Eliminate drafts.
See "Venting".
Open all manual gas vanes.
Replace gas valve.
See "Venting.
Clean or replace valve.
To correct this situation contact the utility
supplying the gas.
Recheck gas input.
Check orifice for clogging. If clogged, clean out the
hole carefully with a smooth wood toothpick. (Do
not in an?" way enlarge or distort it.
This is especially true when a dwelling or room is
enlarged. Have the heat loss calculated and compare to
the appliance output (70% of input). Your gas compan:
or installer can supply you with this information. If
appliance is undersized, replace with correct size ::::it.
2. Setting of thermostat. See "Lighting and Shutting Down
Instructions".
3. Check supply pressure as outlined above.
1. Lower setting of temp. dial. See "Lighting and Shutting
Down Instructions".
2. Combination control valve sticks open. 2. Replace combination control valve.
TROUBLE SHOOTING CHART - AUTOMATIC PILOT & VALVE
_urner won't turn on
1. Pilot flame too large or too small.
2. Dirt in pilot orifice.
3. Defective automatic pilot section in
combination control valve.
4. Detective Thermocouple.
5. Detective combination control valve.
1. Readjust pilot flame using adjustment screw marked
"Pilot" on combination control valve. See Page 10.
2. Clean pilot orifice with air or solvent, do not ream.
3. Replace entire combination control valve.
4. Replace thermocouple.
5. Replace valve.
Page 15