


111044-01D
For more information, visit www.desatech.com
For more information, visit www.desatech.com
4
SAFETY PILOT
This fireplace has a pilot with an Oxygen Depletion Sensing (ODS)
safety shutoff system. The ODS/pilot is a required feature for vent-
free room fireplaces. The ODS/pilot shuts off the fireplace if there
is not enough fresh air.
PIEZO IGNITION SYSTEM
This fireplace has a piezo ignitor. This system requires no matches,
batteries, or other sources to light fireplace.
THERMOSTATIC HEAT CONTROL
This fireplace has a thermostat sensing bulb and a control valve. The
thermostat will automatically modulate the heat output to maintain
a consistent room temperature. This results in greater fireplace
comfort. This can also result in lower gas bills.
UNPACKING
1. Remove log box and fireplace from carton.
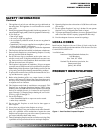
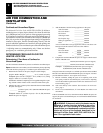
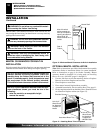
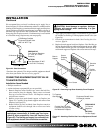
IMPORTANT:
The
fireplace hood is inside the cardboard protective end wrap on
the left side of fireplace (as viewed from front). A decal is on
the outside of the cardboard end wrap stating hood is enclosed
(see Figure 2).
2. Remove hood from cardboard protective end wrap as shown
in Figure 2.
3. Remove all protective packaging applied to fireplace for shipment.
4. Make sure your fireplace includes one hardware packet.
5. Check fireplace for any shipping damage. If fireplace is dam-
aged, promptly inform dealer where you bought fireplace.
Figure 2 - Removing Fireplace Hood
IMPORTANT:
THIS PACKAGE CONTAINS A
FIREPLACE HOOD. UNWRAP
CARTON AND REMOVE HOOD
BEFORE DISCARDING
PROTECTIVE PACKAGING.
1
2
Hood
Cardboard Protective
Fireplace End Wrap
Hood Enclosed
Decal
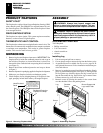
ASSEMBLY
WARNING: Always have branch support and
screen in place before operating fireplace. This pre-
vents excessive temperatures on fireplace surfaces.
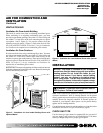
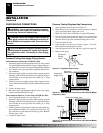
Figure 3 - Assembling Fireplace
ASSEMBLING FIREPLACE
Tools Required:
• Phillips screwdriver
• 5/16" hex wrench
• slotted screwdriver
• scissors
Installing Log
1. Lift screen up and pull out to remove.
2. Cut two plastic straps to remove the log from the firebox cavity.
3. An optional blower is available. See Accessories, page 29. In-
stall optional blower now. Follow installation instructions pro-
vided with blower.
4. Remove log packaging material and discard packaging. Gently
place log set on burner support (see Figure 3). The log should
fit flat against top of burner support and log locator tabs fit
into the slots under the log. Do not allow log to contact flame.
If flame contacts log, soot will be created.
5. Reattach screen by placing the notches in the screen frame
over the shoulder screws and pushing down.
WARNING: Failure to position the parts in accor-
dance with these diagrams or failure to use only parts
specifically approved with this fireplace may result in
property damage or personal injury.
PRODUCT FEATURES
Log
Screen
Burner Support with
Log Locator Tabs
Branch Support
Shoulder
Screw
PRODUCT FEATURES
UNPACKING
ASSEMBLY
Assembling Fireplace