


18
Aspen Woodburning Stove
30000369
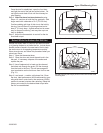
In newer homes that are well-insulated and weather-
tight, poor draft may result from insufficient air in the
house. In such cases, a slightly opened window or
door, near the stove on the windward side of the house
will provide the fresh air needed.
A more effective option for delivering ample combustion
air to the stove is to duct air directly from outdoors to
the stove. In fact, in some areas, provisions for outside
combustion air are required in all new construction. The
optional Aspen Outside Air Adapter #1897 is available
from your dealer.
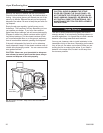
When you first begin using the stove, pay attention
to the air control settings. You will quickly find that a
specific setting will give you a fixed amount of heat. It
may take some time to determine the amount of heat
and the length of burn you should expect from various
settings.
Do not for any reason attempt to increase the firing
of your heater by altering the air control adjustment
range outlined in these directions.
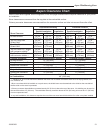
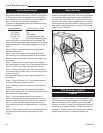
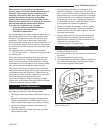
Use the following air control settings as a starting point
to help determine the best settings for your installation.
(Fig. 28)
Aspen Control Settings
Burn Rate Primary Air Control
High From 12:00
Medium From 1:00
Low From 2:00
Before you start using the stove, please read the Ap-
pendix on Draft Management starting on page 24 to
learn how the characteristics of your installation will
affect the stove’s performance. You and the stove are
parts of a system, and other parts of the system have a
strong effect on operation; you may need to vary your
firing technique to get the performance you want.
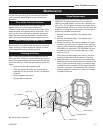
Starting and Maintaining a Fire
Conditioning Your Stove
Cast iron is extremely strong, but it can be broken with
a sharp blow from a hammer or from the thermal shock
of rapid and extreme temperature change.
The cast plates expand and contract with changes in
temperature. When you first begin using your Aspen,
minimize thermal stress by allowing the plates to adjust
gradually during three or four initial break-in fires follow-
ing Steps 1-3.
BURN SOLID WOOD FUEL ONLY, AND BURN IT
DIRECTLY ON THE GRATE. DO NOT ELEVATE THE
FUEL. DO NOT BURN COAL OR OTHER FUELS.
WARNING: OPERATE THIS STOVE ONLY WITH THE
DOOR FULLY CLOSED.
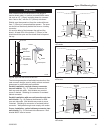
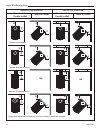
High
ST262
air inlet settings
12/15/99 djt
Medium
Low
ST262a
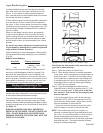
Fig. 28 Air inlet shutter settings; Low - Medium - High.
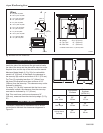
The Primary Air Inlet must be fully open when start-
ing a fire or when refueling.
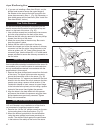
Step 1. Open the primary air control fully.
Step 2. Place several sheets of crumpled newspaper
in the stove. Avoid using glossy or colored paper, as
these burn poorly. At the front of the firebox, place
on the paper six or eight pieces of dry kindling split
to a finger-width size, and on the kindling lay two or
three larger sticks of split dry wood approximately
1-2” (25-51 mm) in diameter.
Step 3. Light the newspaper and close the door.
Gradually build up the fire by adding a few 3-5” (80-
120 mm) diameter splits. If this is one of the first
few “break-in” fires, let the fire burn brightly, and
then let it die out.
• During the break-in fires, don’t let the stove get
hotter than 500°F. (260°C) as measured on an op
-
tional stove-top thermometer. Adjust the air control
lever as necessary to control the fire.
• Some odor from the stove’s hot metal, the paint,
and the cement is normal for the first few fires.
NOTE: Some chimneys need to be “primed,” or
warmed up, before they will draw sufficiently to sus-
tain a fire. To correct this situation, roll up a couple
pieces of newspaper, place them on top of the
kindling and toward the back of the stove, light them,
and close the door. This should heat the chimney
enough to initiate strong draft.