


16
Vermont Castings Seville
30001490
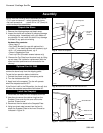
Attach the Chimney Connector
1. If you have not already done so, remove the Outer
Top Plate by simply lifting it off of the stove body.
2. Insert the crimped end of the first section of chimney
connector into the flue collar. Using the holes in the
collar as guides, drill 1/8" (3mm) holes through the
connector pipe. Use the three #10 x 1/2" sheet
metal screws provided to secure the chimney
connection to the flue collar.
3. Replace the Outer Top.
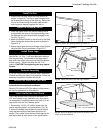
If applicable, attach Chimney Connector Heat Shields
following the instructions included with those parts.
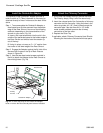
Install the Outside Air Adapter
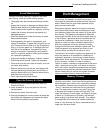
The optional #1882 Outside Air Adapter provides a
collar to which a 3” (76mm) diameter air duct may be
attached directly to the air inlet area at the back of the
stove.
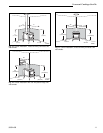
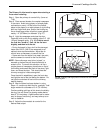
Step 1. To accommodate the Outside Air Adapter, a
small panel must first be removed from the bottom
edge of the Rear Shroud. Use one of the following
methods, depending on the characteristics of the
shroud on your stove. (Fig. 24)
A. Insert a flat head screwdriver into the slot in the
middle of the perforated panel at the bottom edge of
the Rear Shroud and twist to bend the section up
out of the way.
B. Using tin snips, cut away a 4” x 1¹⁄₂” section from
the center of the lower edge of the Rear Shroud.
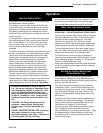
Step 2. Engage the Adapter against the Air Inlet of the
stove so that it rests on the lip of Back Plate as
shown in Figure 24.
Step 3. Use the two sheet metal screws provided in
the kit to attach the Adapter to the Rear Shroud at
the existing holes. (Fig. 24)
4”
2”
Fig. 24 To allow clearance for the Outside Air Adapter,
bend or remove the Rear Shroud panel area as indicated.
Outside Air Adapter
Primary
Air Inlet
Rear Shroud
ST488