


7
Encore 1450 Non-Catalytic Woodburning Stove
30002425
ST492
Defiant
freestanding
installation
11/00
Chimney
Elbow
Slip Pipe
Standard
Connector
Oval to
Round Adapter
Flue Collar
Thimble
Flue Liner
Flue
ST492
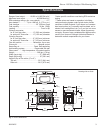
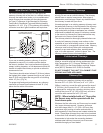
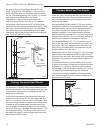
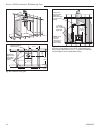
Fig. 6 An exploded view of the chimney connection in a free-
standing masonry installation.
Securing the Single-wall Connector to a
Masonry Chimney
Both freestanding masonry chimneys and fireplace ma-
sonry chimneys may be used for your installation.
Freestanding Installations
If the chimney connector must pass through a combus-
tible wall to reach the chimney, follow the recommen-
dations in the Wall Pass-Through section later in this
manual.
The opening through the chimney wall to the flue
(the “breech”) must be lined with either a ceramic or
metal cylinder, called the “thimble”, which is cemented
securely in place. Most chimney breeches incorporate
thimbles, but the fit must be snug and the joint between
the thimble and the chimney wall must be cemented
firmly.
A special piece called the “thimble sleeve,” slightly
smaller in diameter than standard connectors and
most thimbles, will facilitate the removal of the chimney
connector system for inspection and cleaning. Thimble
sleeves are available from your local dealer.
To install a thimble sleeve, slide it into the breech until
it is flush with the inner flue wall. Do not extend it into
the actual flue passage, as this could interfere with the
draft.
ST243
thinble connection
12/13/99 djt
Thimble Sleeve
Chimney Connector
Flue
Keep
sleeve
end flush
with flue
tile
ST243
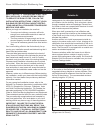
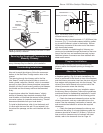
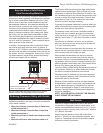
Fig. 7 The thimble, made of either ceramic or metal, must be
cemented securely in place.
The thimble sleeve should protrude 1-2” (25-50mm) into
the room. (Fig. 7) Use furnace cement and thin gasket-
ing to seal the sleeve in place in the thimble. Secure
the chimney connector to the outer end of the sleeve
with sheet metal screws.
Without a thimble, a suitable length of chimney con-
nector can be extended through the breech to the inner
face of the flue liner, and cemented securely in place.
Additional pieces of connector are then attached with
sheet metal screws.
Fireplace Installations
The chimney connector may be connected to the
chimney above the fireplace opening or through the
fireplace.
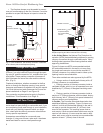
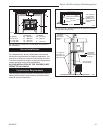
Above the Fireplace
The Encore may be connected to a chimney above
a fireplace opening. (Fig. 8) In such installations, the
stove is positioned on the hearth in front of the fireplace
and the chimney connector rises from the stove top and
then angles ninety degrees back into the chimney. The
chimney liner should extend to the point at which the
chimney connector enters the chimney.
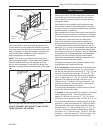
If the chimney connector from your installation enters
the chimney above a fireplace, follow all the guidelines
mentioned above for freestanding installations. In addi-
tion, give special consideration to the following points:
• Check the clearance between the stove and the
chimney connector, and any combustible trim or the
mantel. Use the necessary combination of mantel, trim,
and connector heat shields to achieve the required
clearances.
• Check the clearance between the chimney con-
nector and the ceiling. If no heat shields are used, the
clearance should be at least 24” (610mm). To find out
how much this clearance may be reduced with heat
shields, refer to the clearance chart on Page 14.