


9
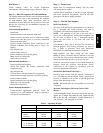
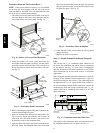
Step 8 — Install Outside Air Hood
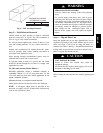
Economizer Hood Removal and Setup --
Factory Option —
1. The hood is shipped in knock--down form and located
in the return air compartment. It is attached to the
economizer using two plastic tie--wraps.
2. To gain access to the hood, remove the filter access
panel. (See Fig. 7.)
3. Locate and cut the (2) plastic tie--wraps, being careful
to not damage any wiring. (See Fig. 8.)
4. Carefully lift the hood assembly through the filter
access opening and assemble per the steps outlined
in Economizer Hood and Two–Position Hood on
page 10.
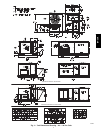
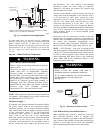
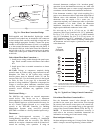
FILTERACCESS PANEL
OUTDOOR-AIR OPENING AND
INDOOR COILACCESS PANEL
COMPRESSOR
ACCESS PANEL
C06023
Fig. 7 -- Typical Access Panel Locations
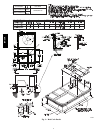
Two Position Damper Hood Removal and Setup --
Factory Option —
1. The hood is shipped in knock--down form and
assembled to a metal support tray using plastic stretch
wrap. Located in the return air compartment, the
assembly’s metal tray is attached to the basepan and
also attached to the damper using two plastic tie--wraps.
2. To gain access to the hood, remove the filter access
panel. (See Fig. 7.)
3. Locate the (2) screws holding the metal tray to the
basepan and remove. Locate and cut the (2) plastic
tie--wraps securing the assembly to the damper. (See
Fig. 9.) Be careful to not damage any wiring or cut
tie--wraps securing any wiring.
4. Carefully lift the hood assembly (with metal tray)
through the filter access opening and assemble per the
steps outlined in Economizer Hood and Two–Position
Hood on page 10.
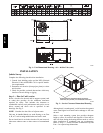
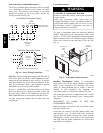
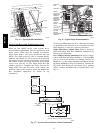
Economizer
Cut Plastic Ties
(2) Places
Remove Hood Parts
C08633
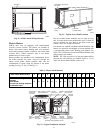
Fig. 8 -- Economizer Wiring
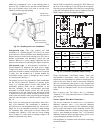
Hood Parts
Plastic Tie Wrap
Qty (2)
Screws for Metal Tray
Qty (2)
C08639
Fig. 9 -- Damper Assembly
50HCQA