


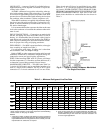


START-UP
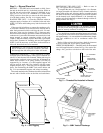
To prevent personal injury, be sure wire fan guards are
secured in place over each fan discharge (or that fans
are ducted) before starting the unit.
Complete Unit Start-Up Checklist on page CL-1 prior to
start-up of this system.
System Evacuation and Dehydration — Refer to
GTAC II, Module 4, ‘‘Dehydration for Proper Evacuation
and Dehydration Techniques.’’
Charging Procedure — BEFORE CHARGING THE
SYSTEM, INSTALL OR REPLACE THE FILTER DRI-
ER(S) CONNECTED TO THE LIQUID LINE IN THE
INDOOR UNITTO PREVENTCONTAMINATION WITHIN
THE SYSTEM. Refer to GTAC II, Module 5 ‘‘Charging,
Recovery, Recycling, and Reclamation’’for proper charging
techniques.
Check Operation of Condenser Fan Motor Con-
trols and Rotation of Fans —
Rotation should be
clockwise as viewed from belt access panel.
IMPORTANT: Check for proper fan rotation. If rota-
tion needs to be reversed, disconnect main power sup-
ply and switch any 2 leads at the load side of the dis-
connect switch.
Adjust Fan Speed — The 09BY units are belt-driven
condenser units and allow for a wide range of inlet static and
condenser airflow requirements. It may be necessary to ad-
just the condenser airflow to account for these inlet condi-
tions. Inadequate airflow will result in poor unit performance
and possible nuisance tripping of high-pressure switches.
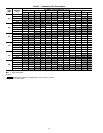
If an airflow is not specified, use the nominal airflow from
Table 2 and adjust the fan speed to compensate for actual
job conditions. Use Table 5 to determine proper fan speed.
If the unit trips on high pressure due to high condensing tem-
perature, then it may be necessary to increase the fan speed
and condenser airflow.
SERVICE
Cleaning Condenser Coils
Do not use high-pressure water or air. Damage to fins
may result.
Clean coils with a vacuum cleaner, fresh water, com-
pressed air, or a bristle brush (not wire). Backflush coil to
remove debris. Commercial coil cleaners may also be used
to help remove grease and dirt. Steam cleaning is NOT rec-
ommended. Units installed in corrosive environments should
be cleaned as part of a planned maintenance schedule. In
this type of application, all accumulations of dirt should be
cleaned off the coil.
Lubrication — Fan motors have permanently lubricated
bearings.
Condenser Fan Adjustment
To prevent personal injury, be sure wire fan guards are
secured in place over each fan discharge (or that fans
are ducted) before starting the unit.
TO CHANGE FAN SPEED
1. Shut off unit power supply.
2. Loosen fan belt by loosening fan motor from mounting
bracket. Do not loosen fan motor mounting bracket from
unit.
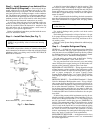
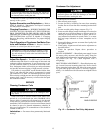
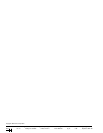
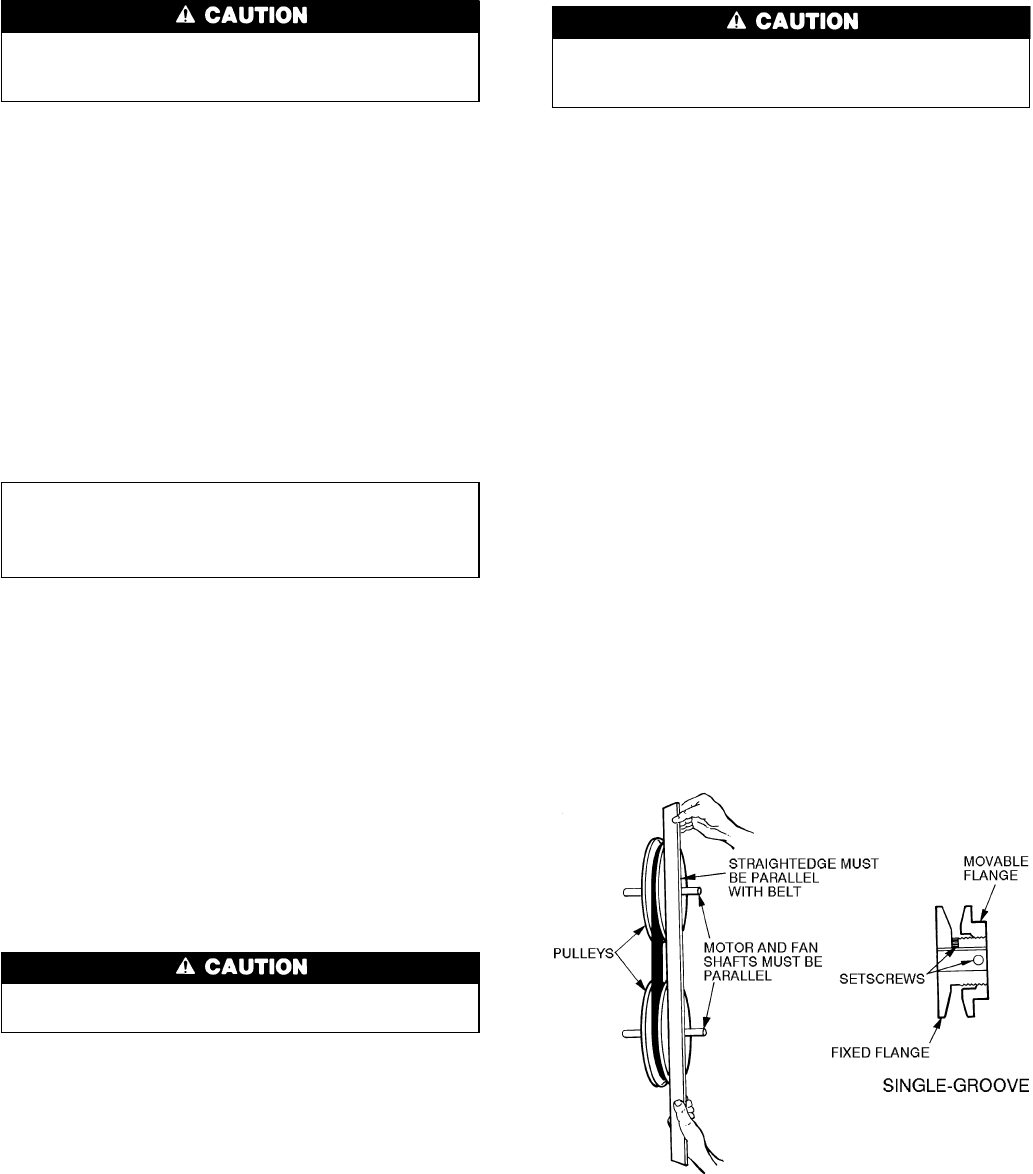
3. Loosen movable pulley flange setscrew (Fig. 12).
4. Screw movable flange toward fixed flange to increase fan
speed and away from fixed flange to decrease speed. In-
creasing fan speed increases load on motor. Do not ex-
ceed maximum allowable fan speed (Table 2) or motor
full load amps indicated on motor nameplate and in
Table 4.
5. Set movable flange setscrew at nearest flat of pulley hub
and tighten setscrew.
6. Check pulley alignment and belt tension adjustment as
described below.
7. Check fan operation. Repeat above procedure as
required.
PULLEYALIGNMENT — Shut off unit powersupply. Loosen
fan motor pulley setscrews and slide fan pulley along fan
shaft. Make angular alignmentby loosening motor from mount-
ing bracket (see Fig. 12). Check alignment with a
straightedge.
BELTTENSIONADJUSTMENT — Shut off unit power sup-
ply. Loosen fan motor mounting plate bolts. Do not loosen
motor mounting bracket from unit. Move fan motor mount-
ing plate until proper belt tension is achieved (approxi-
mately
1
⁄
2
-in. deflection with 8-lb tension at midpoint of belt
span).
Fig. 12 — Condenser Fan Pulley Adjustment
13