


VENTING SYSTEM INSTALLATION
Reference the preceding section and venting components illustrations at the end of this manual to
determine the parts required for your particular venting system installation. The required venting
component parts are available from your Bradford White supplier. Use the Venting System Installation
Instructions supplied inside the carton of this water heater for detailed instructions on putting together the
venting components.
WARNING
The vent system must be properly installed. Failure to properly install the vent system could result in
property damage, personal injury, or death. The installation and service must be performed by a
qualified installer, service agency or the gas supplier. Installation must meet all state and local
codes regarding installation and location of vent systems for direct vent appliances.
DO NOT install damaged venting system components. If damage is evident then please contact the
supplier where the water heater was purchased or the manufacturer listed on the rating plate for
replacement parts.
Use only the vent terminals and vent/air intake components available for venting this water heater.
Contact your Bradford White supplier for obtaining the venting components required for your
installation.
The water heater requires its own separate venting system. Do not connect the exhaust vent into an
existing vent pipe or chimney.
All vent pipe joints must be taped with aluminum tape to prevent leakage. Make sure all pipe
connections are firmly pressed together so that the gaskets make a tight seal.
All of the exhaust venting connections must be leak checked with a soap solution upon initial start up
of the water heater. Any leaks must be repaired before continuing operation of the water heater.
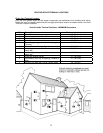
Do not terminate the venting where noise from the exhaust or intake will be objectionable. This
includes locations close to or across from windows and doors. Avoid anchoring the vent and intake
pipes directly to framed walls, floors, or ceilings unless rubber isolation pipe hangers are used. This
prevents any vibrations from being transmitted into the living spaces.
Do not exceed the venting distances or the number of elbows listed in this manual. Exceeding the
maximum venting distances may cause the water heater to malfunction or cause an unsafe
condition.
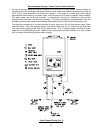
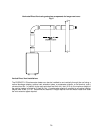
Prior to the Installation of the EVERHOT® direct vent system:
The EVERHOT IGI series has two adjustable wall mounting support brackets fitted on the top and bottom
of the water heater casing. When installing a “Standard Vent Discharge Kit” to vent directly out the wall to
the back of the water heater, these brackets should be adjusted so that the water heater is moved out the
maximum 2” (5.1 cm) away from the wall. Before cutting the vent terminal to the required length, ensure
that the distance the water heater is away from the wall has been accounted for.
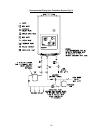
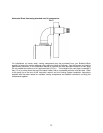
Horizontal Direct Vent Installations
Whenever possible, install the EVERHOT IGI series water heater on or near an outside wall for the
shortest vent with the least number of elbows. The standard vent kit available for this water heater
consists of one 90° vent discharge adapter and a horizontal vent termination kit. This kit is for venting
directly through an outside wall.
24