


Maintenance
3-10
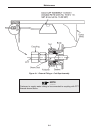
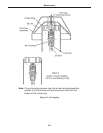
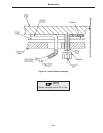
1 Determine which heater element has failed at the junction box, then disconnect the two corre-
sponding leads from the terminal strip. Pull the leads out of the terminal box then out the
elbow cover plate.
2 Remove the heater cover from the bottom of the diffusion pump. Move the insulation to
expose the faulty heater(s).
3 Remove the nuts holding the clamping plate.
4 Lower the entire heating unit (heater element, clamping plate and crush plate) until it is off the
mounting studs.
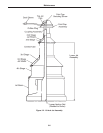
5 Apply an anti-seize compound such as FEL-PRO-C-5A or common milk of magnesia to the
studs as needed.
6 Assemble the new unit (heater element, clamping plate, and crush plate).
7 Support the heating unit by the clamping plate, line up the holes with the boiler studs, and
push the unit up against the boiler plate. Use two nuts finger-tight to hold it in place.
8 Screw on the remaining nut finger-tight, then tighten all nuts evenly up to 250 inch-pounds
of torque.
9 Label the heater leads according to the schematic diagram, then run the wires into the con-
duit and up into the junction box. Connect the leads to the terminal strip then replace the
elbow cover plate.
10 Replace the insulation and heater cover.
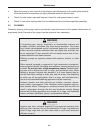
CAUTION
Poor clamping resulting in inadequate thermal contact may result in
reduced heater life and poor pump performance. Tighten nuts finger-
tight on clamping plate, then gradually and evenly tighten them to 250
in-pounds of torque.
CAUTION
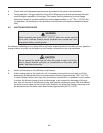
Should it be necessary to use a new wire, it is important that no. 14
stranded nickel wire with high-temperature insulation is used. If copper
or copper-plated wire is used, they will oxidize rapidly because of the
high temperature and the terminals will overheat and fail.
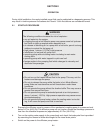
WARNING
High voltages (up to 480V) can kill. Always break the primary circuit to
the power supply before starting to work on the heater and/or its wiring.