


11 - 33
Voltage Measurement
There are two basic rules to be remembered when
using a voltmeter. A voltmeter measures the voltage
difference between the test leads and the voltmeter is
always connected across the circuit under test.
Current Measurement
The two rules to remember when measuring current
with an ammeter are; an ammeter measures the cur-
rent that flows through the meter, and to measure cur-
rent an ammeter must be connected into the circuit.
The latter rule means that the circuit must be opened,
and the ammeter wired into it. Because this procedure
is usually difficult, an ammeter is seldom used for trou-
bleshooting.
Resistance Measurement
An Ohmmeter is used to make resistance measure-
ments and to check continuity through wires and elec-
trical components.
There is one rule to keep in mind when using an ohm-
meter. The ohmmeter has a self contained battery and
requires no electrical power. Using the ohmmeter on a
circuit that has power applied may result in damage to
the meter.
IMPORTANT: Disconnect the equipment battery when
making Ohmmeter test or damage to the Ohmmeter
may result.
IMPORTANT: An ohmmeter reads the resistance of
whatever component is connected between the test
leads. It can be used to check wires, coils, light bulbs,
or any item that conducts current.
11.3 BATTERY
NOTE: Unit comes equipped with a maintenance-free
battery that requires no regular maintenance except
cleaning the terminals.
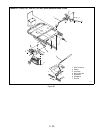
Battery Removal and Installation
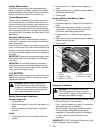
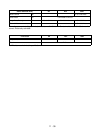
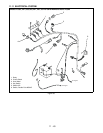
Remove (Figure 32)
1. Tip seat forward.
2. Disconnect negative (-) cable first, then positive (+)
cable.
3. Remove battery hold-down bracket and battery
from unit.
Install
1. Install battery on the unit with battery hold-down
bracket.
2. Connect positive (+) cable first, then negative (-)
cable.
3. Apply petroleum jelly or dielectric grease to battery
cable ends and terminals.
4. Tip seat back.
Cleaning Battery and Battery Cables
1. Tip seat forward.
2. Disconnect negative (-) cable first, then positive (+)
cable.
3. Clean battery cable ends, negative (-) terminal,
and positive (+) terminal with a wire brush and
rinse with a weak baking soda solution.
4. Connect positive (+) cable first, then negative (-)
cable.
5. Apply petroleum jelly or dielectric grease to battery
cable ends and terminals.
6. Tip seat back.
Figure 32
Charging The Battery
Follow First Aid directions for contact with battery fluid.
• External Contact: Flush with water.
• Eyes: Flush with water for at least 15 minutes and
get medical attention immediately!
• Internal Contact: Drink large quantities of water.
Follow with Milk of Magnesia, beaten egg or
vegetable oil. Get medical attention immediately!
• In case of internal contact, DO NOT induce
vomiting!
IMPORTANT: DO NOT fast charge. Charging at a high
rate will damage or destroy battery.
WARNING: Battery posts, terminals and
related accessories contain lead and lead
compounds, chemicals known to the State of
California to cause cancer and reproductive
harm. Wash hands after handling.
WARNING: FROZEN BATTERIES CAN
EXPLODE and result in death or serious
injury. DO NOT charge a frozen battery. Let
the battery thaw before charging.
1. Battery Hold-Down
Bracket
2. Negative (-) Cable
3. Negative (-) Terminal
4. Battery
5. Positive (+) Terminal
6. Positive (+) Cable
4
OE0120
6
5
3
2
1