


14
TANK CLEANOUT PROCEDURE
The following practices will ensure longer life and enable the unit to operate
at its designed efficiency:
1. Once a month the heater should be flushed. Open the drain valve and
allow two gallons of water to drain from the heater. Inlet water valve
should remain open to maintain pressure in tank.
2. A cleanout opening is provided for periodic cleaning of the tank. Gas
must be shut off and heater drained before opening cleanout.
To clean heater through cleanout opening, proceed as follows:
1. Drain heater.
2. Remove outer cover plate from lower side of heater jacket.
3. Remove six (6) hex head screws securing tank cleanout plate and
remove plate.
4. Remove lime, scale, or sediment using care not to damage the glass
lining.
5. Inspect cleanout plate gasket, if new gasket is required, replace with
A. O. Smith part no. 99038.
6. Install cleanout plate. Be sure to draw plate up tight by tightening
screws securely.
7. Replace outer jacket cover plate.
In some water areas the sediment might not be removed by this method
and may result in the water heater making rumbling or boiling noises. To
dissolve and remove these more stubborn mineral deposits, A. O. Smith
UN•LIME Professional Delimer should be used.
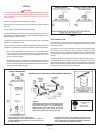
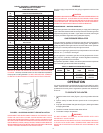
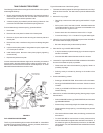
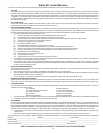
FIGURE 9
FLO-JUG METHOD OF DELIMING
The Flo-Jug is the standard 5 gallon container for UN•LIME -or- it is available
as a deliming kit with hose and fittings. Contact your dealer, distributor or
the A. O. Smith Water Products Company.
Figure 9 illustrates most of the following steps.
1. The heater should be prepared for deliming as described in the “Why?
When and How” booklet. The relief valve may also be delimed at this
time.
2. With the Flo-Jug upright:
• Take off cap, remove cover under opening and install 3/4" x 4" pipe
nipple.
• Drill or punch a 3/16" vent hole in handle. A stainless steel screw
is included with the Flo-Jug kit. This screw is to be installed in the
vent hole when Flo-Jug is not in use.
• Remove drain valve from heater and insert a 3/4" x 4" nipple.
• Connect and clamp 1" I.D. x 3" hose to Flo-Jug and heater nipple.
3. Lift the Flo-Jug to the POUR POSITION and permit the UN•LIME to
flow into the heater as rapidly as possible.
• Be sure to keep the vent just above the liquid level.
4. Place the Flo-Jug in the DELIME POSITION.
• It may be necessary to place the empty jug on its carton to trap the
solution in the heater.
• Allow the UN•LIME to attack the water scale for 5 minutes.
5. Lower the Flo-Jug to the DRAIN POSITION and allow the UN•LIME to
flow out of the heater as rapidly as possible.
• Observe the vent holes and elevate the jug slightly if there is a
possibility of spillage.
• Deliming activity is indicated by foaming on the surface of the
solution.
6. Continue the deliming process:
• Raise jug to POUR POSITION. Allow solution to flow into heater.
• Place jug in DELIME POSITION for 5 minutes. Solution is at work
in heater.
• Lower jug to DRAIN POSITION and allow solution to flow out.
Observe foaming.
7. After one hour, or earlier if the deliming activity (foaming) stops, inspect
the tank interior.
• Drain the UN•LIME back into jug, DRAIN POSITION, and then stand
jug in DELIME POSITION.
• Remove clamp, hose and pipe nipple from heater drain opening.
• Observe interior through opening - a small flashlight may be used
effectively.
• If the interior still shows water scale, the deliming process should
be continued.
• To check UN•LIME for continued use or reuse, place some lime
scale or white chalk into a glass with a small amount of solution. If
the material is vigorously dissolved by the solution, the UN•LIME
can be reused. If not, the UN•LIME has been weakened and should
be replaced.