


14
C: INSTALLING THE OPERATOR
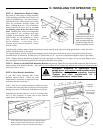
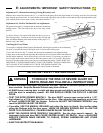
Step 19: Important - Test “Opener
Obstruction Sensing Feature”
A. Activate door to the Open position.
B. Place 2” x 4” laid flat on garage floor under path
of the door.
See Figure.
C Activate door to close position; upon contacting
solid object, the door should stop, then reverse
direction within 2 seconds and travel to the full open
position.
Note: If the fails to pass this test, review Step 17,
above.
Solid Test Object
110055-3
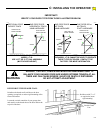
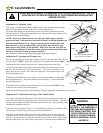
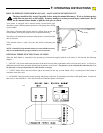
STEP 18: Photoelectric Obstruction Test
Test Procedure
Place an object 6” x 12” on the floor (as illustrated)
progressively on foot from the left side of the door; center
of the door and one foot from the right side of the door.
The object must prevent an open door from closing in any
other mode other than constant pressure on the wall button.
The object should also cause a closing door stop and
reverse to the open position. If it doesn’t, the Safe Finish
photoelectric system must be adjusted lower and the test
repeated until the door responds properly to the 6” object.
If adjustments are needed, refer to Step 13.
If the unit still will not respond and fails this obstruction
sensing beam test, the door may cause severe injury or
12”
12”
6”
12”
Sensor
Garage Door
Opening
110055-2
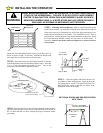
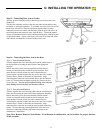
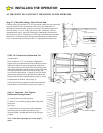
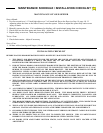
Step 17: Check the Setting - Door Close Limit
Confirm trolley close position 9” to 10” between the inside face of the door and
the point where the door arm connects to the trolley (see illustration). If
adjustment of the close trolley position is necessary, activate the opener and
move the trolley 12” to 18” to provide access to the “Limit Stop” devices
(mounted on the chain). Move the limit stop to establish the correct trolley
close position as above. Relocation of “Limit Stop” toward the door increases
down travel. Relocation of the limit stop away from the door reduces down
travel. Note that each chain link provides 1/2” adjustment of trolley travel.
Cushion Arm
Assembly
Trolley
(Close Limit Position)
Door
Bracket
9”to
110054-1
Chain
Limit Stop
AT THIS POINT PLUG CONNECT THE POWER TO THE OPERATOR.