


B - Verification and Calibration
64
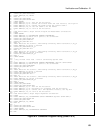
Calibrating and Entering Voltage Calibration Values
Action Display
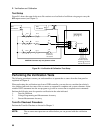
4. Connect the DVM (ac volts mode) directly to the ac source via the ratio
transformer shown in Figure B-1. Do not connect the load resistor or
current shunt.
5.
Press Shift Calibration, scroll to CAL VOLT AC, and press Enter.
CAL:VOLT:AC
6.
Press Shift Calibration, scroll to CAL LEV P1, and press Enter to select
the first calibration point.
CAL:LEV P1
7.
Press Shift Calibration, scroll to CAL DATA, and use the Entry keypad
to enter the voltage value displayed on the DVM. (Multiply the DVM
readings by the transformer ratio if a ratio transformer is used.)
CAL:DATA 0.00
8.
Press Shift Calibration, scroll to CAL LEV P1, use ° to scroll to the P2
parameter, and press Enter. This selects the second calibration point.
CAL:LEV P2
9.
Press Shift Calibration, scroll to CAL DATA, and use the Entry keypad
to enter the voltage value displayed on the DVM. (Multiply the DVM
readings by the transformer ratio if a ratio transformer is used.)
CAL:DATA 0.00
10.
Press Shift Calibration, scroll to CAL LEV P1, use ° to scroll to the P3
parameter, and press Enter.
CAL:LEV P3
11.
Press Shift Calibration, scroll to CAL DATA, and use the Entry keypad
to enter the voltage value displayed on the DVM. (Multiply the DVM
readings by the transformer ratio if a ratio transformer is used.)
CAL:DATA 0.00
12.
Press Shift Calibration, scroll to CAL LEV P1, use ° to scroll to the P4
parameter, and press Enter.
CAL:LEV P4
13.
Press Shift Calibration, scroll to CAL DATA, and use the Entry keypad
to enter the voltage value displayed on the DVM. (Multiply the DVM
readings by the transformer ratio if a ratio transformer is used.)
The ac source is now holding the new voltage calibration constants in RAM
CAL:DATA 0.00
Calibrating and entering realtime voltage calibration values (Agilent 6843A
only)
14.
Press Shift Calibration, scroll to CAL VOLT RTIM, and press Enter.
CAL:VOLT:RTIM
15.
Press Shift Calibration, scroll to CAL LEV P1, and press Enter.
CAL:LEV P1
16.
Press Shift Calibration, scroll to CAL DATA, and use the Entry keypad
to enter the voltage value displayed on the DVM. (Multiply the DVM
readings by the transformer ratio if a ratio transformer is used.)
CAL:DATA 0.00
Calibrating the OVP trip point
17.
Press Shift Calibration, scroll to CAL VOLT PROT, and press Enter.
CAL:VOLT:PROT
18. Wait for the ac source to compute the OVP calibration constant. The
display returns to Meter mode when the OVP calculation is complete.
The ac source is now holding the new OVP calibration constants in RAM
19.
If you are calibrating a 3-phase source, press
Phase Select to select the
next phase and repeat steps 4 through 13 and 17 and 18 for phases 2 and 3.
The phase annunciators on the front panel indicate which phase is active.