


16 Visitor and Community Network Access Concentrator Installation Guide
Installing the VCN
Access
Concentrator
Before installing the VCN AC make sure that:
■ The unit is accessible and can be connected easily.
■ Cabling is away from:
■
Sources of electrical noise such as radios, transmitters and
broadband amplifiers
■
Power lines and fluorescent lighting fixtures
■ Water or moisture cannot enter the case of the unit.
■ Air-flow is not restricted around the unit or through the vents in the
side of the switch. Make sure you provide a minimum of 2.5 cm (1
inch) clearance between the Ethernet switch and the VCN AC
It is recommended to have a ventilated or air conditioned room.
■ The VCN AC is within cable reach of both the patch panel and the
Ethernet switch for which the unit is to be attached.
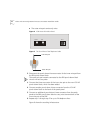
Mounting the VCN
Access Concentrator
in the 19-inch Rack
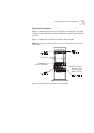
Table 2 lists the accessories needed for mounting the VCN AC in the
19-inch rack.
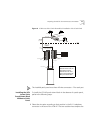
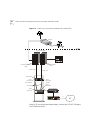
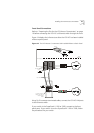
In addition to the VCN AC unit, you will find a box containing the cable
kit needed to install the VCN AC.
Table 3 lists the cable kit parts.
Table 2 The VCN Access Concentrator Accessory Set
No. Part Quantity
1 VCN AC unit 1
2 19-inch brackets 2
3 Handles 2
4 Screws for handles 4
5 Screws for brackets 8
Table 3 The Cable Kit
No. Part Quantity
1 Power Cord 1
2 UTP CAT-5 Patch Cords 24
3 Flat cables (1.5 m each) with
RJ-21 connectors
2