


7
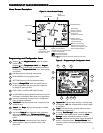
OPERATING YOUR THERMOSTATOPERATING YOUR THERMOSTAT
OPERATING YOUR THERMOSTATOPERATING YOUR THERMOSTAT
OPERATING YOUR THERMOSTAT
Choose the Fan Setting (Auto or On or Prog)Choose the Fan Setting (Auto or On or Prog)
Choose the Fan Setting (Auto or On or Prog)Choose the Fan Setting (Auto or On or Prog)
Choose the Fan Setting (Auto or On or Prog)
Fan
AA
AA
A
uto uto
uto uto
uto is the most commonly selected setting and runs
the fan only when the heating or cooling system is on.
Fan
OnOn
OnOn
On selection runs the fan continuously for increased air
circulation or to allow additional air cleaning.
Fan
PrPr
PrPr
Pr
oo
oo
o
g g
g g
g will run the fan when the heating or cooling system
is on. In addition, when the thermostat has not called for heat
or cool for more than 60 minutes, it will begin to cycle the fan
for 10 minutes on and 20 minutes off to improve indoor air
quality. This is the Comfort Circulating Fan Feature.
Choose the System SettingChoose the System Setting
Choose the System SettingChoose the System Setting
Choose the System Setting
(Cool, Off, Heat, Emer, Auto)(Cool, Off, Heat, Emer, Auto)
(Cool, Off, Heat, Emer, Auto)(Cool, Off, Heat, Emer, Auto)
(Cool, Off, Heat, Emer, Auto)
Press the SYSTEM button to select:
HeaHea
HeaHea
Hea
tt
tt
t: Thermostat controls only the heating system.
OfOf
OfOf
Of
ff
ff
f: Heating and Cooling systems are off.
CoolCool
CoolCool
Cool: Thermostat controls only the cooling system.
AA
AA
A
utouto
utouto
uto: Auto Changeover is used in areas where both heating
and cooling may be required on the same day.
AA
AA
A
UTUT
UTUT
UT
OO
OO
O allows
the thermostat to automatically select heating or cooling
depending on the indoor temperature and the selected heat
and cool temperatures. When using
AA
AA
A
UTUT
UTUT
UT
OO
OO
O, be sure to set the
Cooling temperatures more than 1° Fahrenheit higher than
the heating temperature.
EmerEmer
EmerEmer
Emer: Setting is available only when the thermostat is
configured in HP1 or HP2 mode.
Manual Operation forManual Operation for
Manual Operation forManual Operation for
Manual Operation for
Non-Programmable ModeNon-Programmable Mode
Non-Programmable ModeNon-Programmable Mode
Non-Programmable Mode
PrPr
PrPr
Pr
ess ess
ess ess
ess the SYSTEM button to select Heat or Cool and use
the
or buttons to adjust the temperature to your
desired setting. After selecting your desired settings you can
also press the SYSTEM button to select
AUTOAUTO
AUTOAUTO
AUTO to allow
the thermostat to automatically change between Heat and
Cool.
Manual Operation (Bypassing the Program)Manual Operation (Bypassing the Program)
Manual Operation (Bypassing the Program)Manual Operation (Bypassing the Program)
Manual Operation (Bypassing the Program)
Programmable ModeProgrammable Mode
Programmable ModeProgrammable Mode
Programmable Mode
Press or and the HOLD button and adjust the tempera-
ture wherever you like. This will override the program. The
HOLDHOLD
HOLDHOLD
HOLD feature bypasses the program and allows you to
adjust the temperature manually, as needed. Whatever
temperature you set in
HOLDHOLD
HOLDHOLD
HOLD will be maintained 24 hours a
day, until you manually change the temperature or press
RR
RR
R
unun
unun
un
ScSc
ScSc
Sc
hedulehedule
hedulehedule
hedule to cancel
HOLDHOLD
HOLDHOLD
HOLD and resume the programmed
schedule.
Program Override (Temporary Override)Program Override (Temporary Override)
Program Override (Temporary Override)Program Override (Temporary Override)
Program Override (Temporary Override)
Press or buttons to adjust the temperature. This will
override the temperature setting for a (default) four hour
override period. The override period can be shortened by
pressing
or lengthened by pressing . Program Override
period can range from 15 minutes to 7 days.
ExampleExample
ExampleExample
Example: If you turn up the heat during the morning pro-
gram, it will be automatically lowered later, when the tempo-
rary hold period ends. To cancel the temporary setting at any
time and return to the program, press
RR
RR
R
un Scun Sc
un Scun Sc
un Sc
hedulehedule
hedulehedule
hedule.
If the SYSTEM button is pressed to select
AUTOAUTO
AUTOAUTO
AUTO the
thermostat will change to Heat or Cool, whichever ran last. If
it switches to heat but you want cool, or it changes to cool
but you want heat, press both
or or
or or
or buttons simulta-
neously to change to the other mode.
IMPORTANT!IMPORTANT!
IMPORTANT!IMPORTANT!
IMPORTANT!
PROGRAMMINGPROGRAMMING
PROGRAMMINGPROGRAMMING
PROGRAMMING
Set Current Time and DaySet Current Time and Day
Set Current Time and DaySet Current Time and Day
Set Current Time and Day
1) Press Menu key to enter installer menu. Then press
Set Time once to indicate hour & A or P designation in
clock display.
2) Press and hold either the
or touch key until you
reach the correct hour and A or P designation.
3) Press Set Time again to display minutes only in clock
display.
4) Press and hold either the
or touch keys until you
reach the correct minutes.
5) Press Set Time once again to display year.
6) Press and hold either the
or touch key until you
reach the correct year.
7) Press Set Time once again to display month.
8) Press and hold either the
or touch key until you
reach the correct month.
9) Press Set Time once again to display date of the month
along with day of the week at top row (which is auto-
matic).
10) Press and hold either the
or touch key until you
reach the correct day of the month and day of the week
is automatically calculated and displayed at the top row.
11) Press Run Schedule once; now the display will show the
correct time and room temperature.
Automatic Daylight Saving CalculationAutomatic Daylight Saving Calculation
Automatic Daylight Saving CalculationAutomatic Daylight Saving Calculation
Automatic Daylight Saving Calculation
The Real Time Clock will adjust automatically for daylight
savings time, in the following manner:
Increment one hour at 2 AM on the second Sunday of March
and decrement one hour at 2 AM on the first Sunday of
November. (New DST effective 2007).
The daylight saving feature can be enabled or disabled in
installer configuration menu. Default is
DS ONDS ON
DS ONDS ON
DS ON (enabled).
After entering installer configuration mode, momentarily
press
or touch key until the display indicates dS (in
actual temperature digits) and on (default – in clock digits).
and keys will toggle display and operation from on to
OFF.