


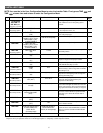
9
CHECK THERMOSTAT OPERATION
FAN OPERATION
If your system does not have a G terminal
Connection, skip to HEATING SYSTEM
section below.
1. Turn power on to the system.
2. Press PROGRAM
RUN
.
3. Press
FAN
until FAN ON is displayed.
The fan should begin to operate.
4. Press
FAN
until FAN AUTO is
displayed. The fan should stop operating.
HEATING SYSTEM
1. Press PROGRAM
RUN
.
2. Press
SYSTEM
until HEAT is displayed. If
the heating system has a standing pilot,
ensure that it is lit.
3. Press the
to adjust thermostat
setting above room temperature. The
heating system should begin to
operate.
4. Press the
to adjust thermostat
setting below room temperature. The
heating system should stop operating.
COOLING SYSTEM
To prevent compressor and/or property
damage, if the outdoor temperature is
below 50°F (10°C), DO NOT operate the
cooling system.
1. Press the PROGRAM
RUN
.
2. Press
SYSTEM
until COOL is displayed.
3. Press
to adjust thermostat setting
below room temperature. The fan should
come on (after the fan-on delay time, if
any), followed by cold air circulation.
4. Press
to adjust temperature setting
above room temperature. The cooling
system should stop operating, the fan
should stop running (after the fan-off
delay time, if any).
MULTI-STAGE/HEAT PUMP
AUXILIARY OPERATION TEST
Follow these steps to energize all stages of
hear or cool to permit system checks during
installation.
HEAT: Press
to raise temperature
setting to 99°F, then hold for five seconds.
The second and third stage (heat pump only)
heat relays will energize immediately for test
purposes. The LED indicator will glow green
for first stage and yellow for second stage, and
flashing yellow for third stage (heat pump
only).
COOL: Press
to lower temperature
setting to 45°F, then hold for five seconds.
The second stage cool relay will energize
immediately for test purposes. The LED
indicator will glow green for the first stage
and yellow for second stage.
EMERGENCY (heat pump only): Press
SYSTEM
to select EMER mode. The LED
indicator will glow red for first stage (Aux) in
emergency mode.
A flashing red LED indicates a malfunction
in the system.
HUMIDIFIER SYSTEM
(IF INSTALLED)
1. Press
SYSTEM
until HEAT is shown at the
top of the display.
2. Press the HUMIDITY % button once and
release. Then press the
to the
maximum humidity setpoint and hold for 7
seconds until ON is displayed. It assures
that the Humidifier will call for humidity
when the thermostat calls for HEAT as
outlined in the following steps.
3. Press PROGRAM
RUN
.
4. Press the HOLD button.
5. Press
to raise the temperature
setting 4°F above room temperature.
The 1st stage (LED Green) and then 2nd
stage (LED Yellow) will be energized.
The HM terminal will also energize for
humidification. The lowercase letter h
will appear to the right of HOLD,
indicating that the thermostat is calling for
Humidification.
6. Press PROGRAM
RUN
to end the
HEAT/HUMIDIFIER test. NOTE: Be
sure to press the Humidity button and
reset the humidity to the level you desire.
DEHUMIDIFICATION SYSTEM
(IF INSTALLED)
1. Press
SYSTEM
until COOL is shown at the
top of the display.
2. Press the HUMIDITY % button once and
release. Then press
to the minimum
humidity setpoint and hold for 7 seconds
until ON is displayed. It assures that the
Dehumidifier will call for dehumidifica-
tion when the thermostat calls for COOL
as outlined in the following steps.
3. Press PROGRAM
RUN
.
4. Press the HOLD button.
5. Press
to lower the temperature
setting 1°F below room temperature. The
1st stage of the cooling system should
begin to operate and the LED indicator
will glow Green. The lowercase letter
d will appear to the right of HOLD,
indicating that the thermostat is calling
for Dehumidification.
6. Press the temperature
to lower your
setpoint 4°F below room temperature, the
DHM terminal will energize causing the
FAN to go to high speed.
7. Press the HUMIDITY % button and set
your desired dehumidification setpoint
in % RH using the
and .
8. Press PROGRAM
RUN
to accept the
change.
CAUTION
!