


9
(1)
(2)
(3)
OPERATING / MAINTENANCE
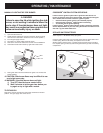
MANUALLY LIGHTING THE SIDE BURNER
ƽ DANGER
Failure to open the lid while igniting the side
burner, or not waiting 5 minutes to allow the
gas to clear if the side burner does not light,
may result in an explosive fl ame-up which can
cause serious bodily injury or death.
1) Open the side burner lid.
2) Check that the side burner valve is turned OFF. (Push the knob
down and turn clockwise to ensure that it is in the off position.).
3) Turn the gas supply valve on.
4) Put match in a match holder and strike match.
5) Push down and turn the side burner control valve to START/HI.
6) Hold match holder and lit match by right side of side burner.
7) Push igniter button and hold until burner ignites. You will hear the
igniter sparking.
ƽ CAUTION: Side burner fl ame may be diffi cult to see
on a bright sunny day.
ƽ WARNING: If the side burner does not light:
1) Turn OFF the side burner control valve.
2) Wait 5 minutes to let the gas clear before you
try again or try to light with a match.
TO EXTINGUISH
Push down and turn each burner control knob clockwise to the OFF
position. Turn gas supply OFF at the source.
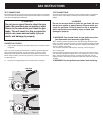
CROSSOVER
®
IGNITION SYSTEM OPERATIONS
If the Crossover
®
ignition system fails to ignite the LEFT burner in a
burner set, light the LEFT burner with a match. If the LEFT burner lights
with a match, then check the Crossover
®
ignition system.
• Check that both ignition wires(1,2) are attached properly.
• Check that the Crossover
®
ignition button is activating.
• You should hear the igniter sparking.
If the Crossover
®
ignition system still fails to light, contact the Customer
Service Representative in your area using the contact information on our
web site. Log onto www.weber.com
®
.
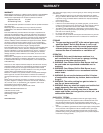
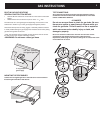
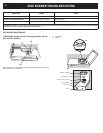
REPLACE IGNITER BATTERIES
Parts required: 1 AA alkaline battery per igniter.
Unscrew igniter button from front of control panel. Remove igniter button and
contact spring. Remove old battery and replace with a new AA
alkaline battery. Positive end (1) of battery faces inward as shown in illustra-
tion. Replace spring contact (2) and screw igniter button (3) back onto battery
compartment.