


5INSTALLATION WEBASTO THERMO 300
5-8
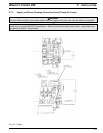
2. Install the fuel standpipe.
- use 1/4” or 1/2” spare port on fuel tank (if available) and install fuel standpipe securely in fuel tank, use pipe
thread sealant on all pipe threads.
3. Route and secure fuel lines from heater to fuel tank. Route according to applicable regulations. Use grommets
to protect fuel lines whenever routed through holes.
4. Connect fuel lines to fuel standpipe and heater using 1/4” (6 mm) I.D. fuel line. Steel braided fuel lines are
recommended for installations where the heater is located in the engine compartment.
CAUTION
Fuel line must be secured every 305 mm (12 in.) and kept away from hot exhaust components and moving parts
(drive shafts, wheels, etc.).
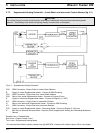
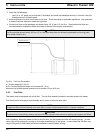
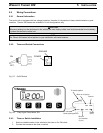
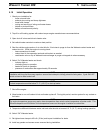
Fig. 5-6: Fuel Line Parameters
A = Suction height 6’6” (2,0 m)
A+B = Suction length and height not to exceed 33’ (10 m)
Maximum fuel system residual pressure not to exceed 0.3 bar (4.35 psi.)
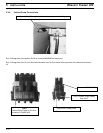
5.8.3 Fuel Filter
The heater must be equipped with a fuel filter. The fuel filter assembly should be mounted close to the heater.
Fuel filters require changing at least annually and in cases of dirty fuel more often.
After installation, before the heater is fired for the first time, the fuel system and filter will require priming. In most
cases, this will be achieved by turning on the heater and allowing it to self prime. In some cases the fuel filter may
require filling with CLEAN diesel fuel before installation to assist system priming.
CAUTION
To prevent fuel nozzle failure, always use clean fuel from a known clean source for priming fuel systems and filters.
NOTE:
Change fuel filters at least annually and more often in cases of sub-standard fuels or in severe conditions.
Thermo 230 / 330