


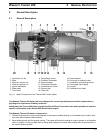


WEBASTO THERMO 300 5INSTALLATION
5-1
5. Installation
5.1 General Information
Webasto will take you step by step through the installation process to ensure successful operation for years to come.
The installation must be performed in accordance with the installation instructions provided in this manual.
IMPORTANT! The proposed heater installation must be approved by Webasto Thermosystems.
5.2 Installation Location
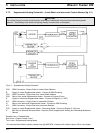
The heater and circulation pump are to be integrated into the coolant system (or into a separate heating circuit, if
applicable) of the vehicle. The heater should be installed as low as possible in the coolant system to assure static
bleeding of the heater and the circulating pump.
The heater is to be installed in a clean and dry environment, usually a separate compartment, accessible for service,
typically towards the rear of the vehicle. The heater may also be located in the engine compartment. The
installation enclosure must provide adequate ventilation for combustion air requirements [4 in² (20 cm²)]. When
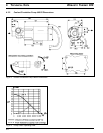
installing the heater, make certain that the clearances required for accessing the unit for servicing are observed (e.g.
removal of the combustion chamber). See figure 4-1, page 4-2.
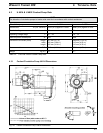
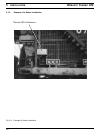
5.3 Mounting the Heater and Enclosure
1. Locate spot to mount heater, refer to fig 5-4, page 5-6
2. Drill holes as needed for size refer to fig ?? page 4-5
NOTE:
This manual does not cover all possible installation variants. For special applications, use this manual as a guideline
only. For further information concerning installations for special applications, contact Webasto Thermosystems
directly at 1-800-555-4518.
WARNING
Due to the danger of poisoning and suffocation, the heater must not be installed in either the drivers compartment or
in the passenger area of vehicles.