


Cleaning Your Garage Door
IMPORTANT: DO NOT USE A PRESSURE WASHER ON YOUR GARAGE DOOR!
An annual inspection of all the surfaces of your garage door(s) will reveal the extent of weather-
ing and the possible need for refinishing. When the finish becomes eroded or thin, clean and
prime any areas showing deterioration. Then completely refinish the door, according to the
directions, listed below, or the manufacturer’s label directions. Proper finishing of the wood
substrates to protect your door(s) from the effects of moisture and sunlight is vital in extending
the service life and beautifying your garage door(s).
The interior and exterior surfaces, as well as all edges must be properly primed, painted and
maintained, to protect and beautify your door. These finishing instructions are intended to
achieve both objectives for your wood doors(s).
NOTE: Be sure to clean behind weatherstrips on both sides and top of door.
CAUTION: NEVER MIX CLEANSERS OR DETERGENTS WITH BLEACH.
GLASS CLEANING INSTRUCTIONS
Clean with a mild detergent solution (same as above) and a soft cloth. After cleaning, rinse
thoroughly.
ACRYLIC CLEANING INSTRUCTIONS
Clean acrylic glazing with nonabrasive soap or detergent and plenty of water. Use your bare
hands to feel and dislodge any caked on particles. A soft, grit-free cloth, sponge or chamois may
be used to wipe the surface. Do not use hard or rough cloths that will scratch the acrylic glazing.
Dry glazing with a clean damp chamois.
NOTE: Do not use any window cleaning fluids, scouring compounds, gritty cloths or solvent-
based cleaners of any kind.
Clean all surfaces of dust, dirt and any other contaminants. Any scarring or stains that occur
during transportation, handling or storage must be re-sanded to the original condition.
Painting Your Garage Door
A high quality exterior 100% Acrylic Latex based finish paint is recommended for painting your
wood door. FOR BEST RESULTS DO NOT USE A DARK COLOR PAINT. HIGH HEAT ABSORPTION
CAN CAUSE EXCESSIVE BOWING AND CRACKING OF THE WOOD. If priming is necessary, prime
the interior and exterior surfaces, as well as all edges, using a primer compatible with the
selected finish paint and for the specific species of wood substrate being finished.
NOTE: Some species of wood, such as cedar, require special primers and finishes to prevent
tannin stains from appearing. Consult with your paint supplier.
If the door is factory primed by Wayne-Dalton, the priming step is not required, except if touch-
up is needed due to surface preparation and re-sanding.
NOTE: Wayne-Dalton uses a latex primer.
Finish paint the interior and exterior surfaces, as well as all edges with at least 2 coats of a high
quality exterior 100% Acrylic Latex finish paint over the primer. Follow paint manufacture’s label
directions explicitly for all coatings.
IMPORTANT: THE FOLLOWING TOP COATS ARE NOT RECOMMENDED. SHAKE AND SHINGLE
PAINTS, CLEAR COATINGS, OIL OR ALKYD PAINTS, VINYL ACETATE (PVA), VINYL ACRYLIC OR
VINYL ACETATE ACRYLIC CO-POLYMER PAINTS.
Clear Or Stained Finishes
If staining, select an exterior grade stain, approved for use on the species of wood substrates
being finished and compatible with Alkyd varnishes. FOR BEST RESULTS DO NOT USE A DARK
STAIN. HIGH HEAT ABSORPTION CAN CAUSE EXCESSIVE BOWING AND CRACKING OF THE
WOOD. Apply the stain to the interior and exterior surfaces, as well as all edges, following stain
manufacturer’s label directions. After proper drying time for the stain, or if wood is being left
natural, apply 1 coat of waterproof exterior Alkyd varnish (marine type varnish) to the interior
and exterior surfaces, as well as all edges. After recommended drying time of 1st coat, sand all
surfaces with fine grit (320) sandpaper. Clean all surfaces of sanding dust and apply a 2nd coat
of the Alkyd varnish to the interior and exterior surfaces, as well as all edges. After 2nd coat is
dry, sand all surfaces again with fine grit (320) sandpaper. Clean all surfaces of sanding dust
and apply a final 3rd coat of the Alkyd varnish to all surfaces.
Three finish coats of waterproof exterior Alkyd varnish are required to properly finish a stained
or natural wood door. Follow the finish manufacturer’s label directions explicitly for each coat
applied.
NOTE: Do not stain MDO plywood, apply paint only.
Only a waterproof exterior Alkyd varnish top coat finish is approved for stained or natural wood
doors. Other types of top coat finishes, including deck sealers, are not acceptable and if used,
will void the warranty.
Operation and Maintenance
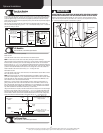
OPERATING YOUR GARAGE DOOR:
Before you begin, read all warning labels affixed to the door and the installation instructions and
owner’s manual. When correctly installed, your Wayne-Dalton door will operate smoothly. Always
operate your door with controlled movements. Do not slam your door or throw your door into the
open position, this may cause damage to the door or its components. If your door has an electric
opener, refer to the owner’s manual to disconnect the opener before performing manual door
operation below.
Manual door operation:
For additional information on manual garage door operations go to www.dasma.com and
reference TDS 165.
IMPORTANT: DO NOT PLACE FINGERS OR HANDS INTO SECTION JOINTS WHEN OPENING
AND/OR CLOSING A DOOR. ALWAYS USE LIFT HANDLES / SUITABLE GRIPPING POINTS WHEN
OPERATING THE DOOR MANUALLY.
Opening a Door: Make sure the lock(s) are in the unlocked position. Lift the door by using the lift
handles / suitable gripping points only. Door should open with little resistance.
Closing a Door: From inside the garage, pull door downward using lift handles / gripping point
only or a high friction area only. If you are unable to reach the lift handles/ suitable gripping
points only, use pull down rope affixed to the side of door. Door should close completely with
little resistance.
Using an electric operator:
IMPORTANT: PULL DOWN ROPES MUST BE REMOVED AND LOCKS MUST BE REMOVED OR
MADE INOPERATIVE IN THE UNLOCKED POSITION.
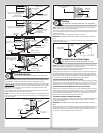
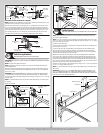
When connecting a drawbar (trolley type) garage door operator to this door, an drawbar opera-
tor and or drawbar operator bracket must be securely attached to the top section of the door,
along with any struts provided with the door. Always use the drawbar operator and or drawbar
operator bracket supplied with the door. To avoid possible damage to your door, Wayne-Dalton
recommends reinforcing the top section on models 8000, 8100, 8200 and 9100 doors with a
strut (may or may not be supplied). The installation of the drawbar operator must be according
to manufacturer’s instructions and force settings must be adjusted properly. Refer to the owner’s
manual supplied with your drawbar operator for complete details on installation, operation,
maintenance and testing of the operator.
MAINTAINING YOUR GARAGE DOOR:
Before you begin, read all warning labels affixed to the door and the installation instructions
and owner’s manual. Perform routine maintenance steps once a month, and have the door
professionally inspected once a year. Review your Installation Instructions and Owner’s Manual
for the garage door. These instructions are available at no charge from Wayne-Dalton, A Division
Of Overhead Door Corporation, P.O. Box 67, Mt. Hope, OH., 44660, or at www.wayne-dalton.
com. For additional information on garage door/operator maintenance go to www.dasma.com
and reference TDS 151, 167 and 179.
Monthly Inspections:
1. Visual Inspection: Closely inspect jambs, header and mounting surface. Any wood found not
to be structurally sound must be replaced. Inspect the springs, counterbalance lift cables, track
rollers, pulleys, rear back hangs and other door hardware for signs of worn or broken parts.
Tighten any loose screws and/or bolts. Check exterior surface of the door sections for any minor
cracks. Verify door has not shifted right or left in the opening. If you suspect problems, have a
trained door system technician make the repairs.
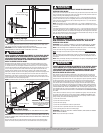
WARNING WARNING
GARAGE DOOR SPRINGS, COUNTERBALANCE LIFT CABLES, BRACKETS, AND
OTHER HARDWARE ATTACHED TO THE SPRINGS ARE UNDER EXTREME TEN-
SION, AND IF HANDLED IMPROPERLY, CAN CAUSE SEVERE OR FATAL INJURY.
ONLY A TRAINED DOOR SYSTEMS TECHNICIAN SHOULD ADJUST THEM, BY
CAREFULLY FOLLOWING THE MANUFACTURER’S INSTRUCTIONS.
WARNING WARNING
NEVER REMOVE, ADJUST, OR LOOSEN THE BOLTS, SCREWS AND/OR LAG
SCREWS ON THE COUNTERBALANCE (END OR CENTER BEARING BRACKETS)
SYSTEM OR BOTTOM CORNER BRACKETS OF THE DOOR. THESE BRACKETS
ARE CONNECTED TO THE SPRING(S) AND ARE UNDER EXTREME TENSION. TO
AVOID POSSIBLE SEVERE OR FATAL INJURY, HAVE ANY SUCH WORK PER-
FORMED BY A TRAINED DOOR SYSTEMS TECHNICIAN USING PROPER TOOLS
AND INSTRUCTIONS.
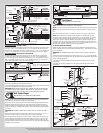
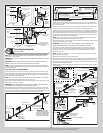
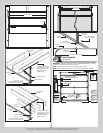
TorqueMaster
®
Plus Springs: Pawl knob(s) (located on the TorqueMaster
®
end brackets above
the door) should be engaged to prevent the door from rapidly descending in case of spring
failure or forceful manual operation.
Torsion Springs: The torsion springs (located above the door) should only be adjusted by a
trained door systems technician. DO NOT attempt to repair or adjust torsion springs yourself.
Extension Springs: A restraining cable or other device should be installed on the extension spring
(located above the horizontal tracks) to help contain the spring if it breaks.
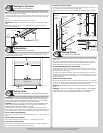
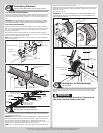
2. Door Balance: Periodically test the balance of your door. If you have a garage door drawbar
operator, use the release mechanism so you can operate the door by hand when doing this
test. Start with the door in the fully closed position. Lift the door to check its balance. Adjust
TorqueMaster
®
or Extension spring(s), if door lifts by itself (hard to pull down) or if door is difficult
to lift (easy to pull down). DO NOT attempt to repair or adjust Torsion Springs yourself. To adjust
TorqueMaster
®
or Extension spring(s), refer to your installation instructions and owner’s manual.
If in question about any of the procedures, do not perform the work. Instead, have it adjusted by
a trained door systems technician.
18
Please Do Not Return This Product To The Store. Contact your local Wayne-Dalton dealer. To find your local Wayne-Dalton dealer,
refer to your local yellow pages business listings or go to the Find a Dealer section online at www.Wayne-Dalton.com
Maintenance