


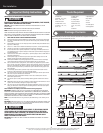


Please Do Not Return This Product To The Store. Contact your local Wayne-Dalton dealer. To find your local Wayne-Dalton dealer,
refer to your local yellow pages business listings or go to the Find a Dealer section online at www.Wayne-Dalton.com
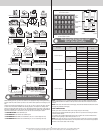
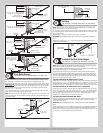
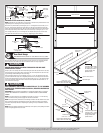
Rear cable
lift sheave
(1) 3/8”-16 x 1-1/4”
Hex head bolt
(1) 3/8” - 16
Hex nut
Sheave
fork
Spring safety cable
Horizontal
track
Sheave fork
Sheave
fork
(1) 3/8” - 16
Hex nut
Spring safety cable
Extension spring
Extension
spring loop
Counterbalance
lift cable
Front cable
lift sheave
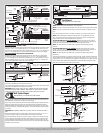
Rear cable
lift sheave
Horizontal
track
Extension
spring
Counterbalance
lift cable
Front cable
lift sheave
Counterbalance
lift cable
3 Hole
clip
Special knot
Horizontal
track
angle
Counterbalance
lift cable
Second slot
“S” Hook
“S” Hook
Spring safety
cable
Rear
cable lift
sheave
Sheave fork
Horizontal track
Hook plate
This illustrations shows doors featuring (2) pairs of extension springs
Counterbalance
lift cable
Counterbalance
lift cable
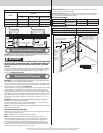
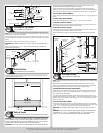
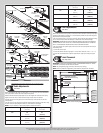
Cable Adjustments
Tools: None
21
Adjust counterbalance lift cables to create about 1” to 2” (25 mm to 50 mm) of initial exten-
sion spring stretch, with the door in the fully opened position.
Measure relaxed extension spring length for your door height and verify with chart. Spring
length must be the same for both extension springs to allow even door balance.
Carefully remove the locking pliers from the horizontal track and lower the door into the
closed position.
Once the door is closed, measure the extension spring length in tension for both sides. Using
the chart, verify the spring length in tension, is correct with your door height.
NOTE: It may be necessary to adjust spring length for proper door balance.
DOOR HEIGHT Spring Length Relaxed
(Door Open)
Spring Length Extended
(Door Closed)
6’0” 25”
(635 mm)
61”
(1549 mm)
6’3” 25”
(635 mm)
62.5”
(1588 mm)
6’6” 25”
(635 mm)
64”
(1626 mm)
DOOR HEIGHT Spring Length Relaxed
(Door Open)
Spring Length Extended
(Door Closed)
7’0” 25”
(635 mm)
67”
(1702 mm)
7’6” 27”
(686 mm)
72”
(1829 mm)
7’9” 27”
(686 mm)
73.5”
(1867 mm)
8’0” 27”
(686 mm)
75”
(1905 mm)
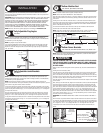
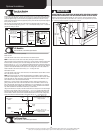
Final Adjustments
Tools: None
22
Now lift the door and check its balance. If the door is hard to pull down or lifts by itself, adjust
extension spring length by moving the “S” hook backward (towards the rear back hangs) to a
different hole in the horizontal angle.
If the door is difficult to lift or too easy to pull down, adjust extension spring length by moving
the “S” hook forward (towards the header) to a different hole in the horizontal angle.
IMPORTANT: WHENEVER ADJUSTING EXTENSION SPRING LENGTH FOR DOOR BALANCE,
ALWAYS OPEN THE DOOR TO THE FULLY OPEN POSITION AND RETURN THE LOCKING PLI-
ERS TO THE HORIZONTAL TRACKS BELOW THE BOTTOM TRACK ROLLERS.
If the door still does not operate easily, lower the door into the closed position and recheck
the following items:
1.) Check the door for level.
2.) Check the distance between flag angles – must be door width plus 3-3/8” + 1/4” – 0”.
3.) Check the counterbalance lift cables for equal tension- adjust by re-tieing the special
knot.
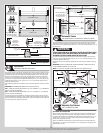
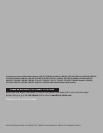
Label Placement
Tools: Step Ladder
23
IMPORTANT: USING THE ILLUSTRATION, ATTACH THE APPROPRIATE LABELS TO THE AP-
PROPRIATE LOCATION ON THE SECTION, AS SHOWN.
NOTE: The Spring Warning tag(s) are factory attached (one per spring).
NOTE: Because of different configurations, some labels may require minor relocations.
WARNING
WARNING
Lift handles/gripping points are required
on this door, located as spelled out in the
installation instructions, even if the door
is motor operated.
Failure to install and use these lift handles/
gripping points on this door can result in
serious injury to fingers and/or hands, if
placed in the opening between sections,
when the door is operated manually.
The adja cent bottom c orner bracket and
all cab le retention features includ ing
milford pins, cotter pi ns, & clevis pins are
under HI GH SPRING TENSI ON.
Adjustments and repairs must only be
made by a trained door systems
technician, using proper tools and
instructions.
DO NOT REMOVE, COVER OR PAINT OVER
THIS LABEL. PRODUCT USER SHOULD
INSPECT THIS LABEL PERIODICALLY FOR
LEGIBILITY AND SHOULD ORDER A
REPLACEMENT FROM THE DOOR
MANUFACTURER AS NEEDED.
WARNING
WARNING
Lift handles/gripping points are required
on this door, located as spelled out in the
installation instructions, even if the door
is motor operated.
Failure to install and use these lift handles/
gripping points on this door can result in
serious injury to fingers and/or hands, if
placed in the opening between sections,
when the door is operated manually.
The adja cent bottom c orner bracket and
all cab le retention features includ ing
milford pins, cotter pi ns, & clevis pins are
under HI GH SPRING TENSI ON.
Adjustments and repairs must only be
made by a trained door systems
technician, using proper tools and
instructions.
DO NOT REMOVE, COVER OR PAINT OVER
THIS LABEL. PRODUCT USER SHOULD
INSPECT THIS LABEL PERIODICALLY FOR
LEGIBILITY AND SHOULD ORDER A
REPLACEMENT FROM THE DOOR
MANUFACTURER AS NEEDED.
HIGH SPRING TENSION CAN CAUSE
SERIOUS INJURY OR DEATH.
DO NOT adjust, repair or remove springs or
parts to which springs are connected, such
as steel brackets, cables, wood blocks,
fasteners or other parts of the
counterbalance system.
Adjustments or repairs must ONLY be made
by a trained door systems technician using
proper tools and instructions.
DO NOT remove, cover or paint over this tag.
Product user should inspect this tag
periodically for legibility and should order a
replacement tag from the door
manufacturer, as needed.
DO NOT REMOVE, COVER OR PAINT OVER
THIS LABEL. PRODUCT USER SHOULD
INSPECT THIS LABEL PERIODICALLY FOR
LEGIBILITY AND SHOULD ORDER A
REPLACEMENT FROM THE DOOR
MANUFACTURER AS NEEDED.
344648 NEW 11/19/2010
CALIFORNIA HEALTH AND SAFETY
CODE SECTION 25249.6
DRILLING, SAWING, SANDING OR
MACHINING WOOD PRODUCTS GENERATES
WOOD DUST, A SUBSTANCE KNOWN TO THE
STATE OF CALIFORNIA TO CAUSE CANCER.
AVOID INHALING WOOD DUST OR USE A
RESPIRATOR OR OTHER SAFEGUARDS FOR
PERSONAL PROTECTION.
WARNING
324100 REV5 01/15/2010
Wayne Dalton, a Division of
Overhead Door Corp.
P.O. Box 67
Mt. Hope, OH 44660
www.wayne-dalton.com
Wayne Dalton, a Division of
Overhead Door Corp.
3395 Addison Dr.
Pensacola, FL 32514
www.wayne-dalton.com
SAFETY INSTRUCTIONS
1. Operate door ONLY when it is properly
adjusted and free of obstructions.
2. If a door becomes hard to operate,
inoperative or is damaged, immediately
have necessary adjustments and/or repairs
made by a trained door system technician
using proper tools and instructions.
3. DO NOT stand or walk under a moving door,
or permit anybody to stand or walk under
an electrically operated door.
4. DO NOT place fingers or hands into open
section joints when closing a door. Use lift
handles/gripping points when operating
door manually.
5. DO NOT permit children to operate garage
door or door controls.
6. Due to constant extreme spring tension,
DO NOT attempt any adjustment, repair or
alteration to any part of the door,
especially to springs, spring brackets,
bottom corner brackets, red colored
fasteners, cables or supports. To avoid
possible severe or fatal injury, have any
such work performed by a trained door
system technician using proper tools and
instructions.
7. On electrically operated doors, pull down
ropes must be removed and locks must be
removed or made inoperative in the open
(unlocked) position.
8. Top section of door may need to be
reinforced when attaching an electric
opener. Check door and/or opener
manufacturer’s instructions.
9. VISUALLY inspect door and hardware
monthly for worn and/or broken parts.
Check to ensure door operates freely.
10. Test electric opener’s safety features
monthly, following opener manufacturer’s
instructions.
11. NEVER hang tools, bicycles, hoses, clothing
or anything else from horizontal tracks.
Track systems are not intended or designed
to support such extra weight.
Place label at a readable height on door. DO NOT
remove, cover or paint over this label. Product
user should inspect this label periodically for
legibility and should order a replacement label
from the door manufacturer as needed.
Copyright 2010 Wayne Dalton, a Division
of Overhead Door Corp.
Residential
warning label
Bottom section warning labels
Torsion spring tag(s) (one per spring)
Residential Dust label
(For California Residents Only)
THIS WOOD PRODUCT REQUIRES PROPER
FINISHING PRIOR TO ANY DOOR HARDWARE BEING
APPLIED. BOTH INNER AND OUTER FACES OF THE
SECTION(S), AS WELL AS ALL EDGE SURFACES
MUST BE PREPARED AND FINISHED IN STRICT
ACC0RDANCE TO THE DIRECTIONS GIVEN IN THE
INSTALLATION INSTRUCTIONS AND OWNER’S
MANUAL UNDER “MAINTENANCE AND PAINTING
INSTRUCTIONS FOR ALL WOOD DOORS”.
IMPROPER STORAGE, IMPROPER TRANSPORTATION
AND/OR DELAY IN FINISHING, THAT ALLOWS FOR
THE EXPOSURE OF THIS WOOD PRODUCT TO
MOISTURE AND/OR OTHER CONTAMINANTS, VOIDS
THE LIMITED WARRANTY.
IMPORTANT
316986
Wood label
important notice
13