


TROUBLESHOOTING
WARNING:
• These procedures must be performed by a qualified HVAC technician or
electrician.
• Risk of personal injury or death could occur by attempting to troubleshoot or
repair this unit by untrained persons.
• Exercise the usual precautions when working with high voltage.
• When the circuit has been de-energized, always discharge any residual current in
the secondary circuit with an insulated handle screwdriver.
• Always ground power supply and Ionizing-Collecting cell when bench testing.
RECOMMENDED SERVICE TOOLS
• Screwdriver, 8” common with insulated handle (plastic)
• Screwdrivers, Phillips #1 and # 2 with insulated handle (plastic)
• Needle Nose Pliers with insulated handles (plastic)
• Multimeter
• High Voltage Probe
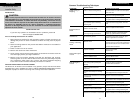
INDICATION OF ELECTRICAL TROUBLE
The air cleaner is equipped with a Red CELL ENERGIZED light for indicating proper unit
operation. When the unit is in normal operation (with the HVAC system blower
running, Front Panel Assembly in place and ON/OFF switch in the ON position) and the
Red CELL ENERGIZED light is not illuminated, the problem is a shorted secondary circuit
or Air Flow Sensor fault. Although failure of the indicating light itself should not be
overlooked, this condition is unusual.
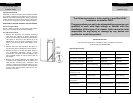
AIR FLOW SENSOR (AFS) TROUBLESHOOTING
WARNING:
The following procedure must be performed by an authorized HVAC contractor.
Failure to do so may expose an individual to serious personal injury or death.
1. Make sure the HVAC system blower is not operating, the ON/OFF switch is in OFF
position and the circuit breaker is turned OFF or input power cord is disconnected.
2. Remove the Front Panel Assembly.
3. Remove the cover from the Power Tray Assembly by removing the two screws on
top of unit.
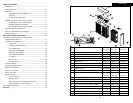
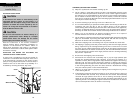
4. Locate the AFS, a small circuit board with a small gray disc connected to the board
by two silver wires (see Air Flow Sensor (AFS) pg. 2). Carefully bend the thermistor
(small gray disc) wire leads so the thermistor is located in the center of the 3/16”
diameter hole in the Power Tray Assembly and approximately 1/8” from the inside
edge of the Power Tray Assembly front.
Troubleshooting
20
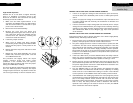
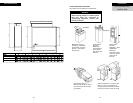
WASHING IONIZING– COLLECTING CELLS AND PRE-FILTERS
Regular washing of the Ionizing-Collecting Cells is necessary to ensure proper performance.
A thorough washing once every two months will be adequate for most installations. More
frequent washing (once a month) may be necessary with some installations (new home for
example) where there is new carpeting, plaster dust or excessive cigarette smoke.
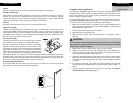
To Remove the Ionizing-Collecting Cells and Pre-filters from the Air Cleaner:
1. Turn air cleaner ON/OFF switch to OFF position. Wait 15 seconds. Remove Front Panel Assembly.
2. Carefully remove the Ionizing-Collecting Cell(s) and Pre-filter(s) and set aside in a safe place.
3. Do not drop the Ionizing-Collecting Cell. This can cause damage to the cell plates or ionizing
wires which results in excessive arcing and poor performance.
To Wash Ionizing-Collecting Cells and Pre-filters:
We suggest you follow the instructions below to properly and thoroughly clean your
Ionizing-Collecting Cells.
1. Place enough hot water in a utility tub to cover the first cell. Dissolve 2-4 oz. of granulated
automatic dishwasher detergent (NOT laundry detergent) in the water.
2. Allow the cell to soak for 30 minutes. Agitate it up and down in the solution until it appears
clean and remove.
3. Repeat with second cell (if applicable).
4. Agitate the Pre-filters up and down in the solution until they appear clean.
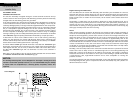
5. With a hose, rinse the Ionizing-Collecting Cells and Pre-filters. The hose should be held
about 10” from the cell plates and at a slight angle for maximum cleaning results. Be careful
not to spray the ionizing wires directly with the hose as the water pressure can cause the
wire(s) to stretch and break. The cell frame should be thoroughly rinsed along the edges to
dislodge any trapped lint or dirt. Carefully wipe a damp cloth or sandpaper (not emery cloth)
along the ionizing wires.
6. Stand Ionizing-Collecting Cells and Pre-filters in upright position and allow to dry two hours.
You may experience a slight discoloration of the aluminum collector cell plates after
washing. This is a normal chemical reaction between the aluminum and detergent and will
not harm your unit or affect its performance.
To Replace Cells in the Air Cleaner:
1. Replace Pre-filter and Ionizing-Collecting Cells in cabinet. Check that airflow arrow on Cells
point in same direction as air flows through the duct. (If you have to force the cell past the
positioning screw in the cabinet bottom, the cell is probably in the incorrect position.)
2. Replace Front Panel Assembly (engage tabs on lower edge of door into slots in cabinet).
Carefully close the Panel.
3. Turn air cleaner ON/OFF switch to ON position.
Maintenance
CAUTION:
Handle Ionizing-Collecting Cells with care as plates can be sharp and cause injury if not
handled properly.
5
For Qualified HVAC
Installer Only