


31
RDVN Series Direct Vent Gas Fireplace
20007628
NOTE: Failure to adjust air shutter to the proper set-
ting will produce sooting.
4. Fasten pilot to burner bracket with two (2) screws.
5. Replace grate assembly.
WARNING: Failure to position the parts in accor
-
dance with these diagrams or failure to use only
parts specifically approved with this heater may
result in property damage or personal injury.
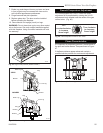
Replace Pilot Orifice
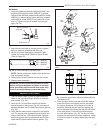
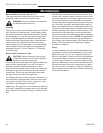
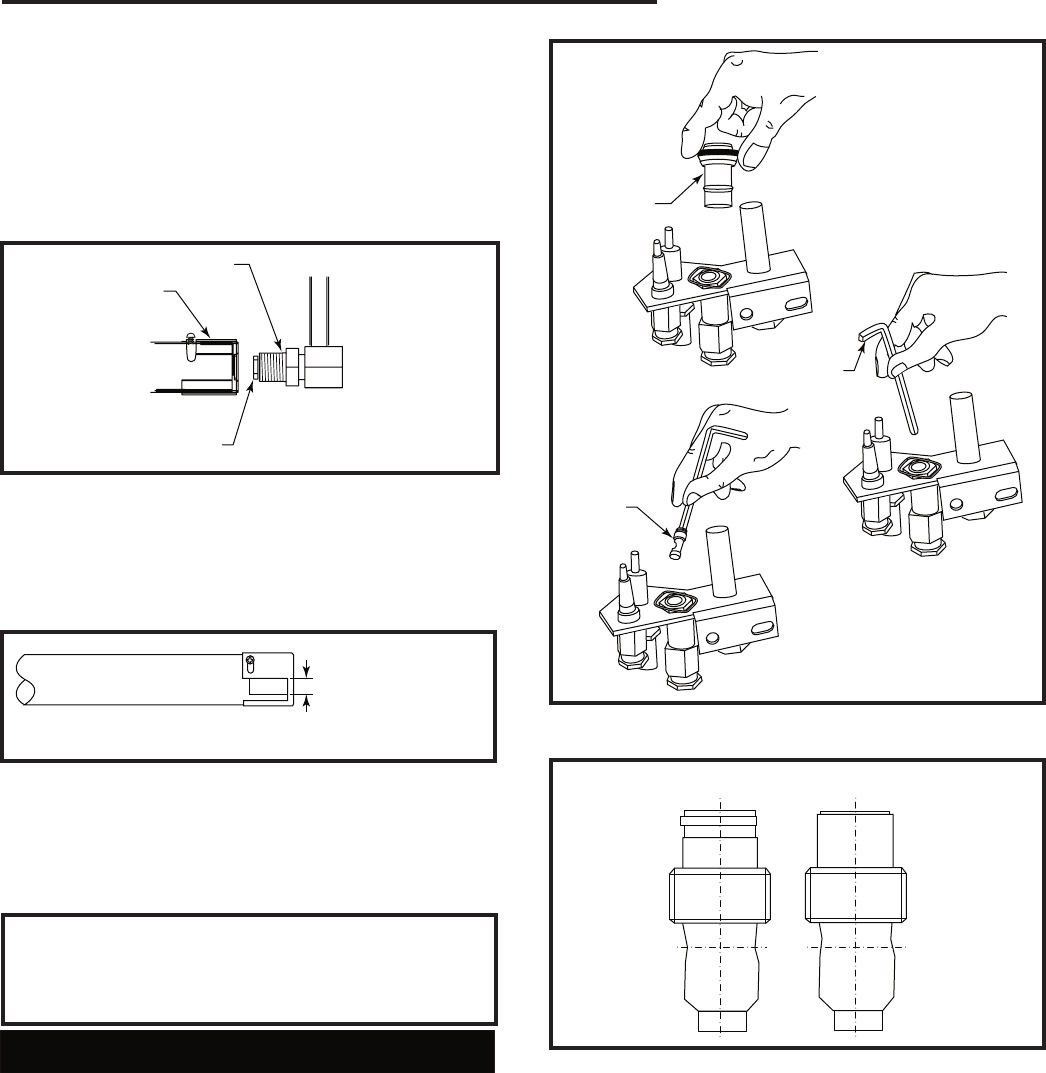
1. The pilot hood is held in place by spring pressure.
Remove the hood by pulling it directly up from the
pilot bracket. (Fig. 53)
2. Insert a 3/32” (4 mm) Allen wrench into the hex
-
agonal keyway of the injector (Fig. 53) and rotate it
counterclockwise until it is free of the injector journal.
(Fig. 53)
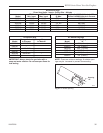
3. Verify that the new injector is proper for the applica
-
tion. The injector size is stamped on the side of the
injector near the top. LPG injectors have a groove
machined around their circumference near the top,
while the NG injectors do not have a groove. (Fig.
T207
remove pilot hood
1/8/04 djt
Pilot
Hood
Conversion
Orifice
Allen
Wrench
T207
Fig. 53 Remove pilot hood and orifice. Insert conversion
orifice.
T208
conversion
injectors
1/8/04 djt
T208
LPG NG
Fig. 54 Injectors.
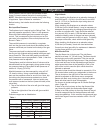
2. Move burner tube back to original position, tighten
split nut assembly and bend tabs back up.
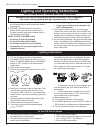
3. Set the air shutter opening for propane/LP gas.
Tighten air shutter screw. (Refer to Figure 52 and
Chart on Page 35)
T207
air shutter
setting
1/8/04 djt
T207
Fig. 52 Air shutter settings for propane/LP gas.
3/8” - 33RDVP
3/8” - 36RDVP
3/8” - 39RDVP
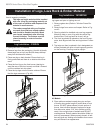
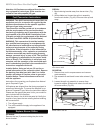
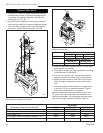
Fig. 51 Replace burner orifice with correct conversion orifice.
T259
remove burner
orifice
6/04
Split Nut Assembly
Air Shutter
Burner Orifice
T259
All Models:
1. Using a suitable tool replace natural orifice #47 with
propane orifice #56 for model 33RDVP, or replace
natural orifice #45 with propane orifice #55 for model
36RDVP, or replace natural orifice #42 with propane
orifice #54 for model 39RDVP furnished with conver
-
sion kit. Tighten orifice with suitable tool until gas
tight. (Fig. 51)
54) Install the conversion orifice furnished with unit
(Conversion Kit).
4. Insert the Allen wrench into the end of the injector.
Insert the injector into injector journal, and rotate
the injector clockwise until a torque of 9 in/lbs. is
achieved. Replace the pilot hood by aligning the
tab on the base of the hood with the slot in the side
of the pilot journal. Push the hood down directly
onto the pilot bracket. (Fig. 53) The hood must sit
squarely on the bracket for proper operation. Check
to insure the hood is properly seated onto the pilot
bracket.