


Water Management Systems and Products Page 11
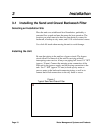
Filling the Unit
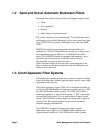
Fill the water tank with water by opening valves e and f. Valves
c, d, g, and h are automatically controlled by a timer. After you
open valves e and f, water flows and is filtered in the normal
direction.
Take a moment now, while the filter is clean, to record pressure
gauge readings at the inlet and outlet of the filter. You’ll use these
readings later to determine the cleanliness of the filter media.
Complete the installation of the sand and gravel filter by plugging
the unit into a 110-volt source of electricity. The sand and gravel
filter is now ready to use.
3-2 Installing the Centri-Separator System
Selecting an Installation Site
Place the unit on a suitable and level foundation, preferably a
concrete floor or pad and near the pump for best operation. The
location you select must also have an open drain to a sewer for
purging and a 110-volt electrical source.
Use a fork lift truck when moving the unit to avoid damage.
Installing Piping
Be sure that piping to the unit has a bypass circuit. The bypass
circuit allows for removal of the unit for servicing without
interrupting water service. Part of your Centri-Separator system
includes a three foot (about 1 m) suction leg, including a priming
valve/connection for startup. Connect the pump suction leg to the
pump suction connection. Sterling/Sterlco recommends that you
use a hose at least 1½” (about 38 mm) in diameter for clean water
flow to the pump tank. Your system includes a threaded barbed
fitting and clamps to install the hose.
Priming the Pump and Preparing for Operation
Be sure that the pump on your Centri-Separator system is primed
before you start up the system. To do this, connect a city water line
to the priming valve. Allow enough time for the suction leg to fill
with water, then close the priming valve.