


8
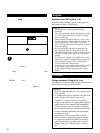
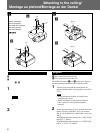
/Attaching to the ceiling/
Montage au plafond/Montage an der Decke/
English
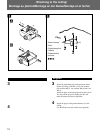
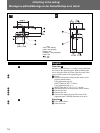
A: One screw hole for the lens side
B: Two screw holes for the lens side
The difference between A and B in the above figures is
that the mounting bracket direction is different (180°).
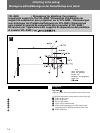
1 Turn the projector upside down and attach the
projector mount bracket (d) using three screws M5 ×
12 (e).
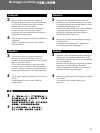
Notes
• When attaching the bracket, be careful not to
overtighten the screws.
• Before attaching the projector mount bracket,
place a protective sheet (cloth) beneath the
projector.
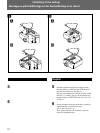
2 Attach adjustment pipe (b) or (c) to projector mount
bracket (d) using a bolt M8 × 50 (f), two washers
M8 (h), two thoothed lock washers M8 (i) and a nut
M8 (j).
Adjustable height using the pipe (b) is 150/175/200
mm (6/7/7
7
/8 inches).
Adjustable height using the pipe (c) is 250/275/300
mm (9
7
/8 /10
7
/8 /11
7
/8 inches).
A
B
A B
1
•
•
2
2
1
Bottom of projector
Base du projecteur
Unterseite des Projektors
Base del proyector
Base del proiettore
(e)
(d)
(e)
A
B
B
(f)
(h)
(i)
(i)
(h)
(j)
(b)/(c)
A
(f)
(h)
(i)
(i)
(h)
(j)
(b)/(c)
(e)
(e)
(d)
(d)
(d)