


Page 52 Deploying SonicPoints for Wireless Access
Note: If you have configured WPA2 as your authentication
type, you do not need to enable WiFiSec.
• If you have enabled WiFiSec Enforcement, you can
specify the following:
• Select WiFiSec Exception Service to select
services that are allowed to bypass the WiFiSec
enforcement.
• Select Require WiFiSec for Site-to-Site VPN
Tunnel Traversal to require WiFiSec security for
all wireless connections through the WLAN zone
that are part of a Site-to-Site VPN.
• If you wish to run WPA or WPA2 in addition to
WiFiSec, you can select Trust WPA/WPA2 traffic
as WiFiSec to accept WPA and WPA2 as
allowable alternatives to IPsec.
• Under SonicPoint Settings, select the SonicPoint
Provisioning Profile you want to apply to all
SonicPoints connected to this zone. Whenever a
SonicPoint connects to this zone, it will automatically
be provisioned by the settings in the SonicPoint
Provisioning Profile, unless you have individually
configured it with different settings.
5. Optionally configure the settings on the Guest Services
tab. For information about configuring Guest Services, see
the SonicOS Enhanced Administrator’s Guide.
6. When finished, click OK.
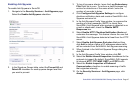
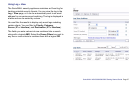
Assigning an Interface to the Wireless Zone
Once the wireless zone is configured, you can assign an
interface to it. This is the interface where you will connect the
SonicPoint.
1. On the Network > Interfaces page, click the Configure
icon in the row for the interface that you want to use, for
example, X3. The interface must be unassigned.
2. In the Edit Interface dialog box on the General tab, select
WLAN or the zone that you created from the Zone drop-
down list. Additional fields are displayed.
3. Enter the IP address and subnet mask of the zone in the IP
Address and Subnet Mask fields.
4. In the SonicPoint Limit field, select the maximum number
of SonicPoints allowed on this interface.
5. If you want to enable remote management of the
SonicWALL security appliance from this interface, select
the supported management protocol(s): HTTP, HTTPS,
SSH, Ping, SNMP, and/or SSH.
6. If you want to allow selected users with limited
management rights to log in to the security appliance,
select HTTP and/or HTTPS in User Login.
7. Click OK.