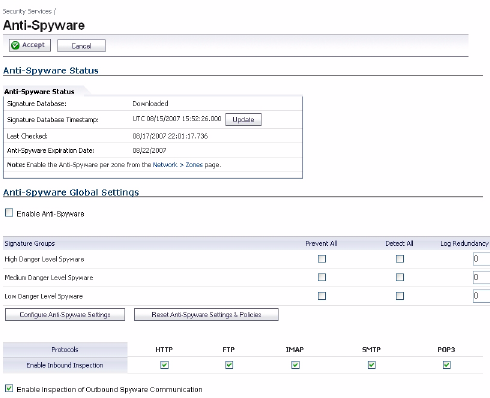
SonicWALL NSA 5000/4500/3500 Getting Started Guide Page 47
Enabling Anti-Spyware
To enable Anti-Spyware in SonicOS:
1. Navigate to the Security Services > Anti-Spyware page.
Select the Enable Anti-Spyware checkbox.
2. In the Signature Groups table, select the Prevent All and
Detect All checkbox for each spyware danger level that
you want to prevent.
3. To log all spyware attacks, leave the Log Redundancy
Filter field set to zero. To enforce a delay between log
entries for detections of the same attack, enter the
number of seconds to delay.
4. Click Configure Anti-Spyware Settings to configure
clientless notification alerts and create a SonicWALL Anti-
Spyware exclusion list.
5. In the Anti-Spyware Config View window, to suppress the
sending of e-mail messages (SMTP) to clients from
SonicWALL Anti-Spyware when spyware is detected in an
e-mail or attachment, check the Disable SMTP
Responses box.
6. Select Enable HTTP Clientless Notification Alerts and
customize the message. This feature informs the user that
SonicWALL Anti-Spyware detected a threat from the HTTP
server.
7. Select Enable Anti-Spyware Exclusion List and then
click Add to define a range of IP addresses whose traffic
will be excluded from SonicWALL Anti-Spyware scanning.
8. When finished in the Add Anti-Spyware Range dialog box,
click OK.
9. In the Anti-Spyware Config View window, click OK.
10. Select the Enable Inbound Inspection checkboxes for the
protocols to inspect. By default, SonicWALL GAV inspects
all inbound HTTP, FTP, IMAP, SMTP and POP3 traffic.
11. Select the Enable Inspection of Outbound
Communication checkbox to enable scanning of traffic
that originates internally.
12. On the Security Services > Anti-Spyware page, click
Accept.


