


RECEIVER AND TRANSMITTER
PROGRAMMING
After the receiver and transmitter are installed, the receiver
must be programmed to receive the transmitter frequency.This
process may require two people, depending upon how far apart
the receiver and transmitter are during the programming pro-
cess.
NOTE
Verify that the ignition key switch is in the OFF position before
installing the main fuse or attaching the negative battery cable.
1. Models with main fuse: Refer to the service manual and
follow the instructions to install the main fuse.
Models with main circuit breaker: Refer to the service
manual and follow the instructions to attach the negative
battery cable.
Apply a light coat of Harley-Davidson electrical contact
lubricant (Part No. 99861-02), petroleum jelly or corrosion
retardant material to the negative battery terminal.
2. Check that a red LED is illuminated on the front of the
Harley-Davidson garage door opener receiver (in the
garage), indicating power to the receiver.
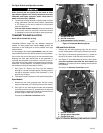
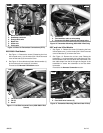
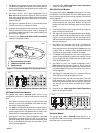
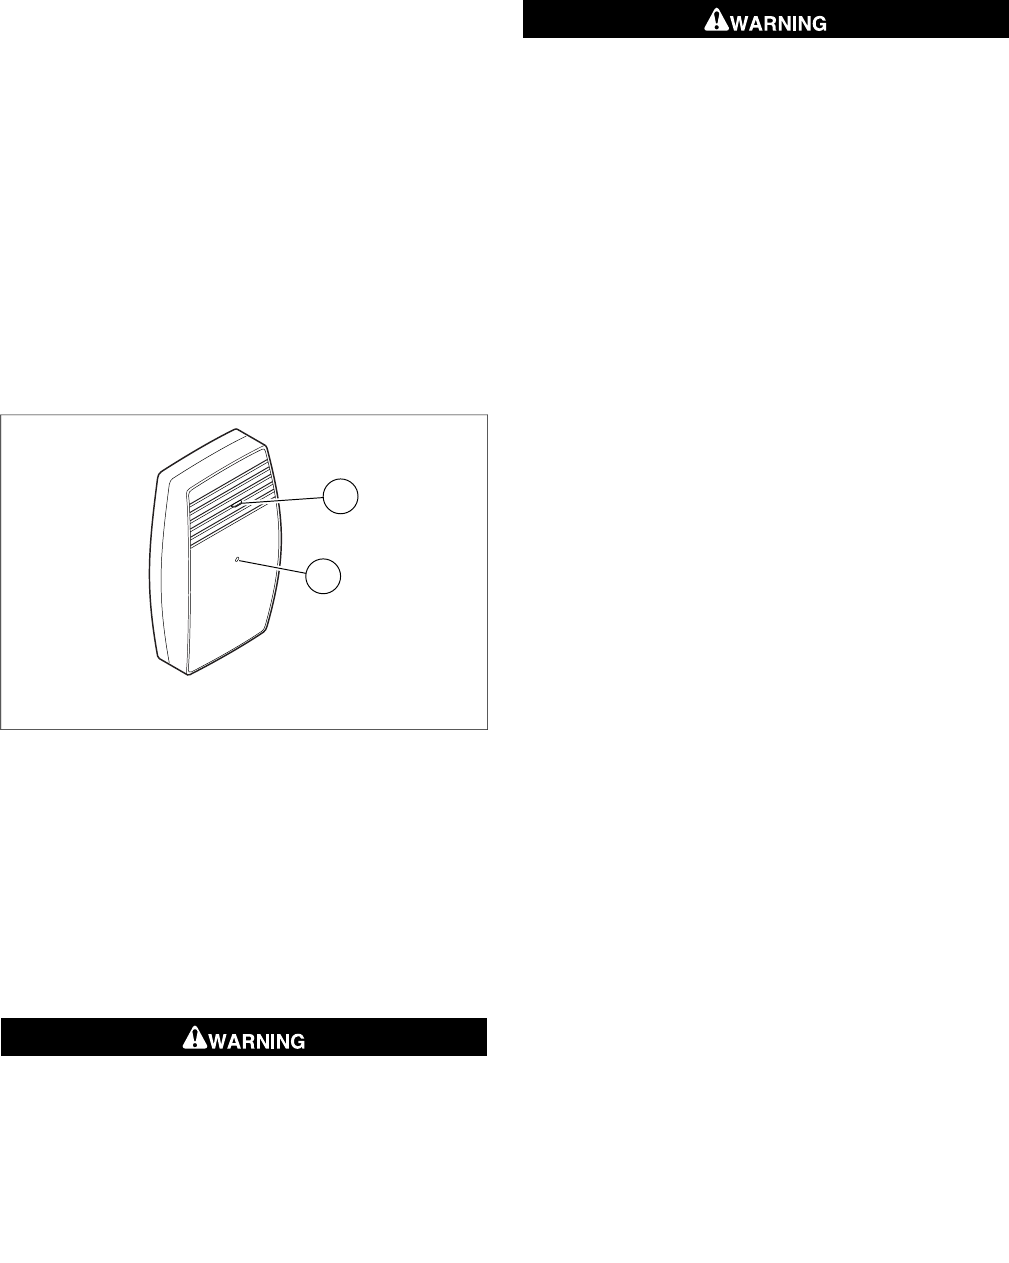
3. See Figure 26. Press and hold the SET button on the
Harley-Davidson garage door opener receiver.The LED
on the transmitter (on the vehicle) blinks continuously
while the SET button is pressed.
1
2
is06733
1. SET button
2. LED
Figure 26. Garage Door Opener Receiver, Front View
4. Turn the ignition key switch to IGNITION, but do not start
the vehicle. Operate the headlamp beam switch using one
of these sequences:
• With the headlamp on LO beam, switch to HI, then LO.
• With the headlamp on HI beam, switch to LO, then HI.
When the receiver acquires a signal from the transmitter, the
LED on the transmitter turns off.
5. Release the SET button on the receiver.
Be sure that all lights and switches operate properly before
operating motorcycle. Low visibility of rider can result in
death or serious injury. (00316a)
NOTE
Clear all obstructions away from between the transmitter and
receiver before testing the operation of the garage door opener.
6. Test the garage door opener, and headlamp high beam
and low beam operation.
NOTE
When the transmitter is activated by toggling the headlamp
switch, the red LED on the transmitter illuminates for one
second to indicate that the transmitter is functioning correctly.
After installing seat, pull upward on seat to be sure it is
locked in position. While riding, a loose seat can shift
causing loss of control, which could result in death or
serious injury. (00070b)
7. Refer to the service manual, and follow instructions to
install or close the seat.
8. Turn the ignition key switch to OFF.
9. Install any parts that were removed for transmitter install-
ation.
TROUBLESHOOTING
Headlamp Switch Toggled, but Garage Door Opener
Does Not Function.
With the ignition key switch turned to IGNITION:
1. Does the LED on the vehicle transmitter flash when the
headlamp switch is toggled?
• YES. Proceed to Step 2.
• NO. Proceed to Step 3.
2. Does the LED on the garage-mounted receiver flash once
when the signal is transmitted from the vehicle?
• YES. Proceed to Step 4.
• NO. Proceed to Reset the Receiver.
3. Verify proper connections to the vehicle power wires,
headlamp wires and ground.
4. See Receiver Installation near the front of these
instructions.
a. Verify that the receiver is properly wired to the
existing garage door opener unit.
b. Verify that the receiver is spaced a sufficient dis-
tance from the existing garage door opener receiver.
Reset the Receiver
1. Unplug the receiver from the 110 Volt power outlet.
2. Wait ten seconds.
3. Press and hold the program button on the receiver, While
holding the button down, plug the receiver into the power
outlet.The red LED will flash rapidly.
4. Release the program button. The receiver is now reset,
and all memory is erased.
5. Program the receiver again. See the Receiver and
Transmitter Programming section earlier in these
instructions.
-J02028 14 of 16