


38
SELECTING UTILITY
STITCH PATTERN
Utility stitches are indicated in the pattern chart
located inside of the top cover.
When you turn on the machine, straight stitch will
be selected automatically.
Select utility stitch pattern as follows.
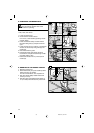
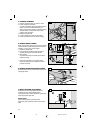
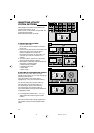
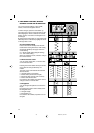
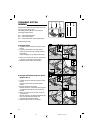
A.SELECTING THE PATTERN
1. Press the utility button.
First 5 patterns will be indicated on the lower
line of LCD.
2. Press the scroll down button, first 5 patterns will
slide to the upper line of LCD and next 5
patterns will appear on the lower line.
By pressing the scroll up or down button, you
can scroll up or down in increments of 5
patterns.
3. To select a pattern, press the function button
directly under the desired 5 patterns.
4. When pattern is selected, LCD will indicate the
information of selected pattern.
a. Stitch Number and pattern
b. Suitable presser foot
c. Stitch Width
d. Stitch Length
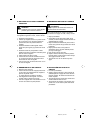
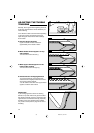
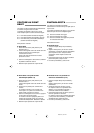
B.SETTING STITCH WIDTH AND LENGTH
Machine will set the stitch width and length
suitable for the pattern. You can make changes by
pressing function buttons.
First, check that the lower arrow mark is
highlighted (e). If not, press the mode button (f).
For narrower width, press function button (g).
For wider width, press function button (h).
For shorter length, press function button (i).
For longer length, press function button (j).
Pre-set stitch width and length will be indicated as
a highlighted number.
k. For straight stitch patterns (No. 1, 2, 3, 5, 7),
Stitch width buttons will change the needle
position.
Note: When further width or length adjustment is
not possible, machine will emit multiple audible
beeps.
2003.9.10, 8:31 PM38