


57
15
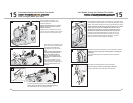
AUTO
Couture à l'aiguille optionnellejumellée
Largeur du point
Pour la couture à l'aiguille jumellée, réglez la
longueur du point entre «2» et «4».
Longueur du
point
Aiguille jumellée en option
N'utilisez que des aiguilles Singer
Type d'aiguille: #2025,
Disponible dans votre magasin Singer
Tension du fil d'aiguille
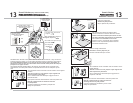
IMPORTANT: seule la position centrale de
l'aiguille peut être sélectionnée avec
l'aiguille double.
Needle position
Position de
l'aiguille
IMPORTANT: la largeur du point doit être réglée en
fonction de la largeur de l'aiguille. Si la largeur de
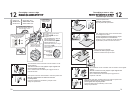
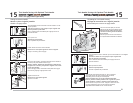
La couture à l'aiguille jumellée produit deux lignes de coutures parallèles. En sélectionnant un point
droit et en insérant une aiguille jumellée, vous pouvez créer un ourlet surpiqué sport ou une lisière
sophistiquée. Sélectionnez un point zigzag ou un point décoratif et insérez l'aiguille jumellée pour
créer une double rangée de coutures ornementales. Essayez d'enfiler chacun des chas d'une couleur
différente pour obtenir un effet exceptionnel.
point réglée ne correspond pas à la largeur de
l'aiguille, l'aiguille piquera dans le pied et
se cassera.
Pattern selector
Sélecteur de point
Coser con Aguja Doble (opcional)
IMPORTANTE: Sólo puede seleccionarse la
posición alcentro de la aguja cuando se usa
aguja doble.
IMPORTANTE: El ancho de puntada debe
ajustarse dentro del rango de la aguja doble.
La aguja golpeará el pie y la romperá si el
ancho está fuera del rango.
Posición de aguja
Ancho de puntada
Tensión de hilo
Largo de
puntada
Para costura con aguja doble, ajuste
el largo de puntada entre “2” y “4”
Selector de puntadas
Aguja doble opcional. Use agujas Singer
#2025. Consulte a su vendedor Singer.
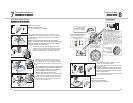
La costura con aguja doble produce dos hileras de líneas paralelas. Cuando se selecciona una puntada
recta e inserta una aguja doble puede crear un dobladillo deportivo o un pespunte sofisticado.
Seleccione una puntada Zigzag o una puntada decorativa e inserte la aguja doble para crear una hilera
doble de una puntada decorativa. Intente ensartar cada ojo de la aguja con un hilo de color distinto
para obtener un efecto único.
Twin needle sewing produces two rows of parallel lines of stitching. When selecting a Straight stitch and
inserting a twin needle you can create a sporty cover hem, or a sophisticated top-stitch. Select a Zig-zag
stitch or a decorative stitch, and insert the twin needle to create a double row of stitch embellishment.
Try threading each eye of the needle with a different color of thread for an unique effect.
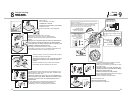
Optional twin needle
Use Singer twin needles Style #2025.
See your Singer retailer
Start with needle thread tension
in Auto position
For twin needle sewing it is recommend to set
Stitch length between “2” and “4”.
Stitch length
IMPORTANT: The Stitch width must be set within
the twin needle range. The needle will hit the foot
and break if the width is set outside of the range.
Stitch width
IMPORTANT:
Only the Center Needle position can
be selected when using a twin needle.
Twin Needle Sewing with Optional Twin Needle
2
0
5
4
3
1
S
T
R
E
T
C
H
56
14
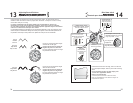
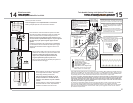
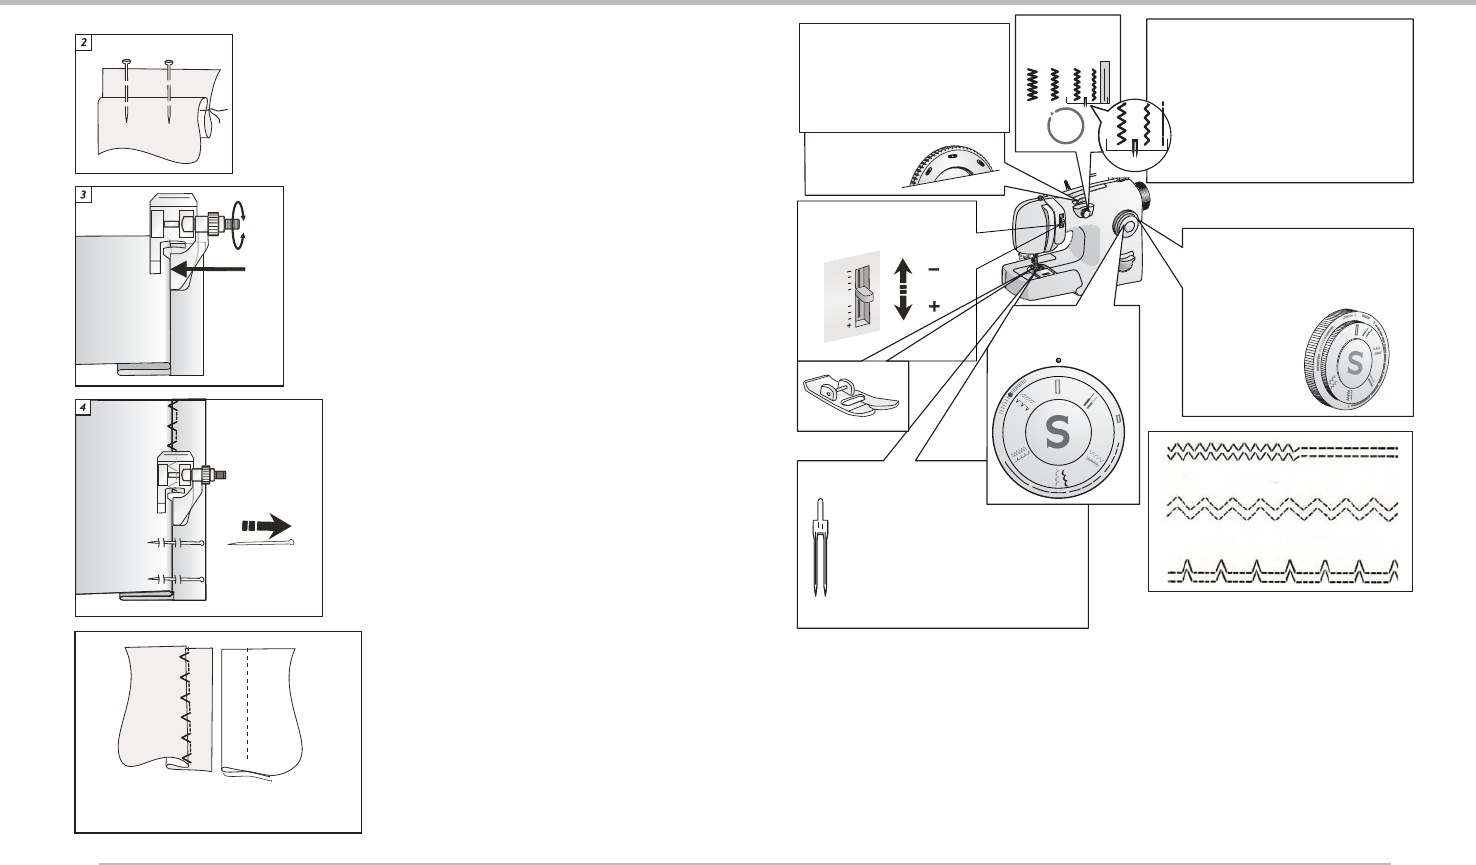
Pliez et épinglez le tissu conformément à l'illustration.
Placez le tissu sous le pied pour point invisible, le pli
du tissu doit être positionné de façon à ce que l'aiguille
ne pique le pli que quand l'aiguille pique du côté
gauche.
Utilisez le cadran de largeur du point pour
régler avec précision la position exacte de
l'aiguille quand elle pique le pli de tissu.
Une fois la couture terminée, le fil est
presque invisible sur l'endroit du tissu,
surtout si vous utilisez un fil de la même
couleur.
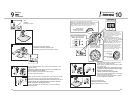
Point invisible
Envers
Anverso
Endroit
Derecho
Doble y coloque alfileres en la tela como se muestra.
Coloque la tela debajo del prensatelas para dobladillos
con el doblez de la tela colocado de modo que la aguja
apenas tome el doblez cuando la aguja se mueva a la
izquierda.
Use el control de ancho de puntada para ajustar la
posición exacta de la aguja.
Cuando termine, el hilo será casi invisible en
el lado derecho de la tela, especialmente
cuando se usa hilo de color de la tela.
Puntada para dobladillo invisible
Fold and pin fabric as shown.
Place the fabric under the blind hem presser foot with
the fold of the fabric positioned so that the needle just
pierces the fold when the needle swings to the left.
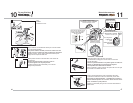
Use the stitch width control to fine tune the exact
position of the needle as it pierces the fabric fold.
When finished, the thread is almost invisible
on the right side of the fabric, especially
when using matching thread color.
Underside
Topside
Blind hem stitch