


-- 27 --
27
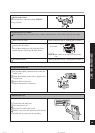
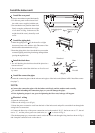
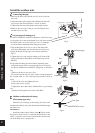
Connecting the pipe
1.Remove the flare nuts from the cut-off valves of the out-
door unit.
2.Align the center of the piping flare with the relevant valve,
and screw in the flare nut about 3~4 turns by hand.
3.Tighten the flare nut with spanner and torque wrench.
4.Remove the valve caps of the gas valve and liquid valve
and the service port nut.
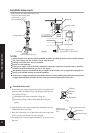
Air purging and leakage test
For the air conditioners with R22 refrigerant, as the below step:
1.Loosen the valve stem of the liquid valve with a hex wrench.
2.Push the check valve core of the gas valve to discharge
air and moisture remaining in the refrigerant system.
3.Stop pushing the valve core as soon as the refrigerant
starts to be discharged, and reinstall the service port nut.
4.Open the liquid valve and gas valve entirely (shown in
Fig.9).
5.Tighten the valve caps and test leakage at all joints of the
piping (both indoor and outdoor) with liquid soap or leak
detector.
6.If possible, discharge air and moisture remaining in the
refrigerant system with a vacuum pump.(shown in Fig.10)
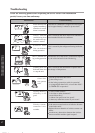
For the air conditioners with R407C refrigerant, as the below
step:
1.Remove the nuts of one-way valve.
2.Evacuate from the one-way valve with a vaccum pump until
the vacuum meter is 5 Torr, and keep up evacuating 1 hour or
more.
3.Turn off the valve and fighten the nuts.
4.Fully open valves. (Fig.9)
5.Tighten the nuts. then check whether there is gas leaking
out.
*Moisture inside pipeline must be less 200 PPm.
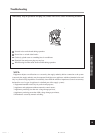
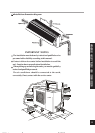
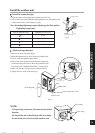
Outdoor condensation drainage
(Heat pump type only)
When the unit is heating or defrosting, the waste water
formed in the outdoor unit can be drained out reliably through
the drain hose.
Installation:
Install the outdoor drain elbow in the 25 hole on the
base plate as shown in Fig.11, and joint the drain hose to the
elbow, so that the waste water formed in the outdoor unit
can be drained out to a proper place.
Fig.10
Manifold gauge
Nut
Vacuum pump
Gas tube
Liquid tube
Base plate
Outdoor drain elbow
Fig.11
gas valve
Liquid valve
valve cap
one-way valve
screw driver
Fig.9
Install the outdoor unit
66162002 6 02 11 30 102627