


17
BUILT-IN STITCHES
ZIPPER INSERTION
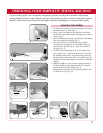
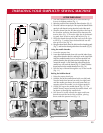
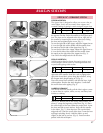
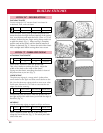
The zipper foot is designed to allow you to sew close to
raised edges. Easily and accurately insert zippers and
covered cording or piping in seams using the zipper foot.
Remove the presser foot holder. Attach the zipper foot to
the presser foot bar. Raise the needle to the highest posi-
tion. The foot can be adjusted to the left or right side of
the needle by loosening the screw on the foot, sliding
the foot and re-tightening the screw [Fig. 1].
To sew the right side of the zipper, adjust the zipper foot so
it is on the right side of the needle and the needle clears
the notch on the left side of the zipper foot [Fig. 2].
To sew the left side of the zipper, adjust the zipper foot so
it is on the left side of the needle and the needle clears
the notch on the right side of the zipper foot [Fig. 3].
Use ONLY the straight stitch with this foot.
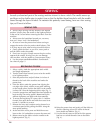
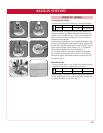
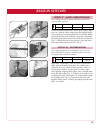
PIPING INSERTION
Add decorativ
e detail to home decorating projects and
create designer fashion looks by inserting covered cord
or purchased piping within seams.
Attach the zipper foot and adjust the sliding foot to the
right side of the needle. Baste the cord or piping to the
right side of one fabric piece along the seamline, using
the longest stitch length setting of 4 [Fig. 4].
Place the second layer of fabric with the first layer, right
sides together. Shorten the stitch length to 3 and stitch
the seam close to the piping [Fig. 5].
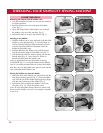
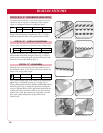
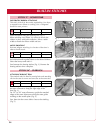
NARROW HEMMING
The narrow hem foot actually rolls the fabric edge to create
a narrow hem for napkins, ruffles, scarves, and dainty hem
finishes on clothing.
Fold a 1/8” double hem to the wrong side of fabric, for
about 2” along the beginning of the hem [Fig. 6]. Place
the rolled edge of the hem under the presser foot. Lower
the foot and take several stitches. Stop with the needle
in the fabric [Fig. 7]. Raise the foot. Pick up the fabric
edge and roll it into the scroll of the foot. Lower the foot
and begin stitching slowly. Hold the fabric up and
slightly to the left as you sew [Fig. 8]. Practice makes
perfect with this technique!
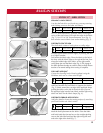
STITCH “A” - STRAIGHT STITCH
Fig. 1
Fig. 2
Fig. 3
Fi
g. 4
Fig. 5
Fig. 7
Fig. 8
Fig. 6
Narrow hem
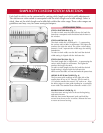
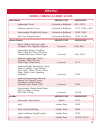
STITCH STITCH WIDTH STITCH LENGTH PRESSER FOOT
A 0 3 Zipper
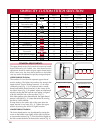
STITCH STITCH WIDTH STITCH LENGTH PRESSER FOOT
A 0 3 Zipper
STITCH
STITCH WIDTH STITCH LENGTH PRESSER FOOT
A 0
3 Hemmer