


16
MAINTENANCE
Cartridges/Tank
10
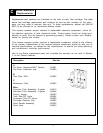
Refer to Section B in the Owner's Manual portion of this guide for a suggested replacement
schedule.
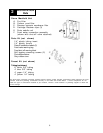
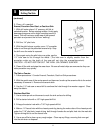
Cartridge Replacement
1. Close the feed water shut-off valve.
2. Close the tank shut-off valve.
3. Open the R/O dispensing faucet.
4. Pull the manifold unit from the installed location.
5. Remove the retaining clip at the front of the unit. Pull the cartridge off the manifold evenly at
top and bottom. Dispose of used cartridge.
6. Install the new cartridge, rocking gently from side to side as necessary until the cartridge
tubes are properly engaged in the manifold connectors. Install the retaining clip, ensuring the
slide locks snap into place in the slots. If the clip does not snap easily into place through the slots
it means the cartridge is not fully inserted into the connectors. Press top or bottom of cartridge to
engage connectors until it snaps into place properly.
7. Turn on feed water shut-off valve.
8. Turn on tank shut-off valve. Observe system for any leaks, especially at newly replaced
cartridge.
9. Close dispensing faucet after water stops running.
10. If replaced cartridge was a post carbon or a membrane filter, the system should be flushed at
least once as described above under Section 9.
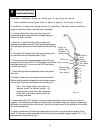
Tank Sanitizing
Tank sanitizing should be done every twelve months as part of the regular system maintenance
program through an authorized Sierra dealer. This procedure will take approximately 30 min-
utes. As a safety precaution, always wear protective eyegear, mix chemicals in a well-ventilated
area, and avoid breathing the fumes.
1. Measure 3¼ ounces Oxine Concentrate for each gallon of tank capacity. Pour into a plastic
container.
2. Add 10 grams of Bio-Cide Activator Crystals. Let stand for five minutes to activate solution.
3. Pour activated solution into tank. Fill tank completely with potable water. Bleed air from
lines. Let stand for 10 minutes.
4. Drain tank and lines. Flush thoroughly using potable water.