


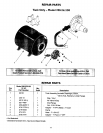


MAINTENANCE
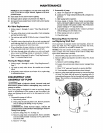
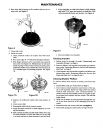
4. Place back half of pump on flat surface and tap out ce-
ramic seat. See Figure 6.
I. Screw impeller on shaft (clockwise) while holding
shaft with 7/16" open end wrench on shaft flats. This
will automatically locate seal in place. See Figure 8.
4790t94
Figure 6
5. Clean seal cavity.
6. Install new seal.
A. Clean polished surface of ceramic seat with clean
cloth.
B. Wet outer edge of "O" Ring with detergent solution.
C. With finger pressure press seat firmly and squarely
into cavity. See Figure 7A. Polished face of seat faces
inside of pump. If seat will not locate properly, place
cardboard washer over polished face and use piece of
3/4" standard pipe for pressing purposes. See Figure
7B.
Figure 7A Figure 7B
483 0194
D. Dispose of cardboard washer and clean surface of
seat.
E. Clean motor shaft.
F. Reassemble back half of pump to motor.
G. Apply detergent solution to inside diameter of rotat-
ing seal member.
H. Slide rotating member on shaft tmtil rubber drive ring
hits shaft shoulder. NOTICE: BE SURE you do not chip
or scratch seal face on shaft shoulder or seal will leak!
478 0194
Figure 8
J. Remount diffuser on seal plate.
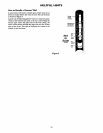
Cleaning Impeller
1. Follow steps 1A through 1E under "Disassembly and
Assembly of Pump _ on Page 8.
2. Remove diffuser and impeller from pump per instruc-
tions under "Removing Motor for Service and Replacing
Shaft Seal" on Page 8.
3. Clean impeller and reassemble impeller and diffuser per
instructions under "Removing Motor for Service and
Replacing Shaft Seal" on Pages 8 and 9.
Cleaning Shallow Well Jet
To remove debris from venturi or nozzle, proceed as fol-
lows:
1. Disassemble pump per instructions on Page 8.
2. Turn venturi counterclockwise and remove it. The noz-
zle is now exposed. Remove it using a 5/8" hex socket
wrench with extension. Turn counterclockwise. If
socket wrench is not available, insert an ice pick or sim-
ilar pointed tool carefully into the nozzle. This will dis-
lodge debris.
3. Flush out the debris by running water through the noz-
zle in the same direction as the dislodging tool was in-
serted.
4. Reinstall nozzle and venturi. Do not ove.rtighten_
5. Reassemble pump per instructions on Pages 8 and 9.
9