


OPERATION
Priming the Pump
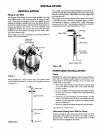
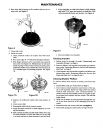
NOTICE: To properly prime the pump, install a pipe tee in
the discharge piping (see Figure 1, Page 4).
To prevent damage to internal-parts, do not start motor until
pump has been filled with water.
To prime pump:
1. Remove priming plug (Purchase separately; Figure 1,
Page 4).
2. Fill pump with water.
3. Replace priming plug, using Teflon tape or Plasto-Joint
Stik 2on plug threads; tighten plug.
4. Start the pump. Water should be pumped in 1-2 minutes.
If not, repeat steps 1, 2 and 3.
On shallow depths to water (10 feet or less), the pump
5.
will probably prime the first time after the following
steps 1 through 4 above.
From 10 to 20 foot depths, you might have to shut off
the pump and repeat steps 1, 2 and 3 several times.
If, after priming pump several times, no water is
pumped, check the following:
A. Be sure suction pipe is in the water.
B. Be sure suction pipe does not leak.
C. Be sure that pump is not trying to lift water too high
(see "Piping in the Well", Page 4).
D. As long as foot valve and check valve function cor-
rectly and suction pipe does not develop leaks, pump
should not need repriming in normal service.
-"Lake Chemical Co., Chicago, Illinois
MAINTENANCE
Lubrication
It is not necessary to lubricate the pump or its motor. The
motor bearings are lubricated for life. The mechanical shaft
seal in the pump is water lubricated and self-adjusting.
Draining for Winter
La' _AMNtr_ta j Risk of electric shock. Disconnect power
before working on unit.
Pump should be drained whenever it is disconnected from
service or is in danger of freezing.
1. DISCONNECT POWER.
2. Open faucet and relieve all pressure on system before
proceeding.
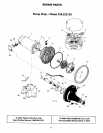
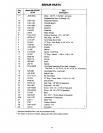
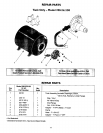
3. Disconnect pressure switch tube (Key No. 17, Page 12)
at barbed elbow on pressure switch (Key No. 28) and
allow tube to drain.
4. Open draincock (Key No. 22, Page 12) on pump body
and allow pump to drain.
5. Remove priming plug to vent pump; disconnect hose
(Key No. 6, Page 14) at tank end and drain pressure tank
and all piping to a point below the frost line.
6. Be sure to drain any piping that may be cut off from nor-
mal system drain due to check valve installation.
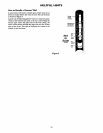
Vinyl Bag Removal
[,I_WARNING] Be sure ALL air pressure has been re-
leased from tank before removing nuts from flange.
Failure to do this may result in serious or fatal injury.
Do not attempt to .open tank unless all pressure has
been relieved!
[AWARNING] Risk of electric shock. Disconnect power
before working on unit.
1. DISCONNECT POWER TO PUMP.
2. Drain system as follows:
A. Open faucet closest to tank.
B. Open draincock (Key No. 22, Page 12) on pump
body.
C. Remove hose (Key No. 6, Page 14) from tank flange.
3. Relieve (expel) ALL air pressure in system by removing
valve core.
4. Disconnect outside piping from tank and pump.
[&WARNING] To avoid serious or fatal injury, be
sure all air pressure has been released from tank
before proceeding to step 5.
5. Remove nuts and washers from tank inlet flange (Key
No. 2, Page 14). Tap inlet flange to break seal. Remove
flange.
6. Wherever convenient, hold bag with pliers and cut with
single-edge razor blade or sharp knife. Bag will not come
out in one piece. Continue pulling and cutting until bag
is removed.
7. Clean and dry inside of tank.
8. Place replacement bag on a clean surface with opening
up. Flatten bag and force air out.
9. Tightly roll bag towards center opening.
10. Before center opening is covered up, force air out of re-
maining portion of bag. Finish rolling bag.
11. To make bag easier to insert into tank, sprinkle outside
of bag with talcum powder.
12. Being careful not to break valve, stand tank on end. Push
tightly rolled bag into tank.
13. Reach into bag and push out sidewalls. You need not
remove all wrinkles.
14. Clean center opening ring on bag and lip on tank.
15. Pufl ring on bag through tank opening and fit over tank
lip. BE SURE it seats properly in groove on tank lip.
16. Clean sealing surface of inlet flange and"pla'ce on studs.
17. NOTICE: Tighten nuts as follows:
A. Hand tighten all nuts.
B. Tighten one nut snug.
C. Tighten opposite nut snug.
D. Proceed, tightening opposite pairs to a snug fit.
E. Recheck all nuts, using same pattern. Be sure all nuts
are tight and you have a good seal.