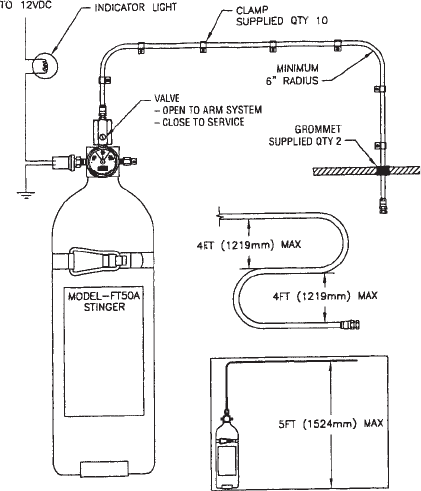
Figure 6
THE FT EXTINGUISHER INSTALLATION IS COMPLETE.
INDICATOR LIGHT OPERATION
All Sea-Fire extinguishers approved for marine applications are packaged with an indicator
light and escutcheon. ‘‘The U.S. Coast Guard approval requires an indicator light if this unit is
installed for the protection of a boat’s engine compartment.” The indicator light (unless re-
placed by another Sea-Fire method) must be installed for system supervision and operator
awareness. When properly installed, activation of electrical power to the system will illumi-
nate the light indicating normal charged condition. System discharge or loss of pressure will
immediately extinguish the indicator light. In the event that the indicator light is not lit when
power is applied, check for the following conditions:
1. Check pressure indicator gauge for proper range.
2. Check fuse and indicator light and replace if defective
(lamp replacements available from factory).
3. Check for loose electrical connections.
4. Remove and weigh system cylinder as described in
MAINTENANCE Section of the manual.
INDICATOR LIGHT INSTALLATION
Select a location at the helm on or near the console that is in full view of the helmsman, the
location selected must have access for electrical wiring. Remove the adhesive protective
cover from back of indicator escutcheon and attach. For proper adhesion, surface must be
clean and dry and temperature must be above 50°F (10°C). Use the preformed escutcheon
hole as a template and carefully drill a 5/16" (8mm) hole. Insert indicator light wire through
hole and seat light assembly by pressing clip into position. Indicator light is now ready for
wiring (see Figure 3).
CAUTION: PRIOR TO WIRING INDICATOR LIGHT, TURN OFF ELECTRICAL POWER
BY SWITCHING OFF CIRCUIT BREAKER, REMOVING FUSE OR DISCONNECTING
POSITIVE BATTERY TERMINAL. FAILURE TO DISCONNECT ELECTRICAL POWER
6


