


OTHER APPLICATIONS
• Engine Compartments (maximum 150 cubic feet)
• Bow Thrusters
• Small Generator Set Enclosures
• Consoles
• Electrical Enclosures
• Flammable Liquid Storage Areas
• Pump Enclosures
• Alternative Fuel Storage Areas
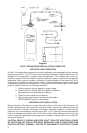
In case of a fire and system discharged, the electrical supply to the motor must be discon-
nected. Failure to do so may result in re-ignition after the FM-200® concentration depletes.
Disconnect may be accomplished by using a shutdown system. See OPTIONAL EQUIPMENT.
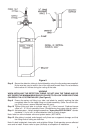
INSTALLATION
READ ENTIRE INSTRUCTION MANUAL AND CYLINDER NAMEPLATE PRIOR TO
INSTALLATION.
These installation instructions are intended to cover most normal installations. Additional
technical or application information can be obtained by contacting
Sea-Fire Marine Sea-Fire Europe LTD
Baltimore, Maryland, USA or Southampton, England
Tel: 410-687-5500 Tel: (0) 1329 847225
Website: www.sea-fire.com
CAUTION:
1. DO NOT INSTALL IN AN AREA DESIGNATED FOR OCCUPANCY.
2. ACCIDENTAL DISCHARGE MAY CAUSE SERIOUS INJURY.
3. HANDLE THE CYLINDER WITH EXTREME CARE.
4. WEAR EYE PROTECTION.
5. DO NOT LIFT OR CARRY CYLINDER BY THE MANIFOLD OR ACTUATOR COMPO-
NENTS.
6. DO NOT ATTEMPT TO LOOSEN OR REMOVE ANY EXTINGUISHER COMPONENT.
7. DO NOT ATTACH SEA-FIRE EXTINGUISHER ON UNDERSIDE OF COVER OR COM-
PARTMENT HATCH THAT COULD BE THROWN CLEAR DUE TO POSSIBLE EX-
PLOSION.
8. DO NOT MOUNT WHERE AN ACCUMULATION OF STANDING WATER COULD
BLOCK SENSOR OR CAUSE CORROSION.
9. EXTINGUISHER TO BE MOUNTED IN THE VERTICAL POSITION ONLY.
10. DO NOT USE FOR PRIMARY ENGINE COMPARTMENT PROTECTION.
EXTINGUISHER INSTALLATION:
Step 1 Carefully remove extinguisher from carton and visually check for damage in shipment.
Step 2 To ensure that the extinguisher is operational, both the weight and pressure indicator
must conform with the extinguisher specification as shown on the nameplate. Weigh
extinguisher (less bracket) on an accurate calibrated scale before installing. Record
date and weight on tag provided for this purpose.
Step 3 Choose a suitable location inside or outside the protected area where accidental
damage is unlikely to occur.
Step 4 Ensure mounting surface is durable (Prefer no less than __ inch. Mounting on fiber-
glass surfaces: A backing washer (flat) or plate should be utilized if the thickness is
less than inch.
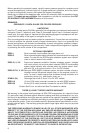
Step 5 Using the bracket as a template, drill (4) ____” diameter holes. Mount the bracket
using no less than Grade 5 corrosive resistant ____” fasteners. (See Figure 5)
Step 6 Install the extinguisher into the bracket and latch clamp.
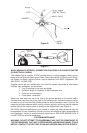
Step 7 If required to route detection tube through a compartment wall, drill hole 25/64" diam-
eter, and utilize supplied grommet to protect tube from wear. (See Figure 6)
4