


CGTH INSTALLATION, OPERATION AND SERVICE MANUAL
34
SECTION 8: OPERATION
8.1 Operating Instructions
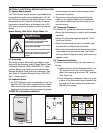
1. Set the thermostat to the lowest setting.
2. Turn off all electric power to the heater.
3. Do not try to light the burner by hand.
4. Turn off the manual gas valve in the heater supply
line.
5. Wait five (5) minutes to clear out any gas. If you
then smell gas, STOP! If you do not smell gas, go
to the next step.
6. Open the manual gas valve in the heater supply
line.
7. Turn on electric power to the heater.
8. Set the thermostat to the desired setting.
9. If the heater will not operate, See Section 8.2 and
call your service technician or gas supplier.
8.2 To Turn Off Gas To Heater
1. Set the thermostat to the lowest setting.
2.Turn off all electric power to the heater if service is
to be performed.
3.Turn off the manual gas valve in the heater supply
line.
8.3 Sequence of Operation
1. When the thermostat calls for heat, the blower
motor will energize.
2. When the motor approaches nominal running
speed, the pressure switch closes and activates
the ignition module which in turn initiates the
purge.
3. The ignition module then energizes the spark
igniter.
4.When sparking begins, the gas valve is energized.
5. If a flame is detected, the gas valve remains open.
When the call for heat is satisfied, the system con-
trol mechanism de-energizes and the gas valve is
turned off.
6. If no flame is detected, the gas valve is closed, and
a purge period begins. After the purge period, the
ignition module energizes the spark igniter and the
gas valve. If a flame is still not established, a third
and final purge/ignition sequence is begun. After
three failed attempts, the system control mecha-
nism will lock out for a period of one hour or until
the unit is reset. Reset is accomplished by remov-
ing power from the heater for at least five seconds.
7. With a three-try module, when the flame is estab-
lished and then lost on the first or second trial, the
gas valve will automatically turn off. A purge and
trial for ignition will then occur.
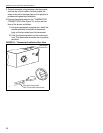
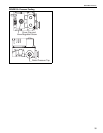
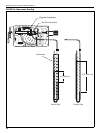
8.4 Testing
Establish that a satisfactorily purged gas supply and
an electrical supply is available to the heater.
With the gas supply turned off at the gas valve, and
the electrical supply isolated by switching off at the
local switch and removing the appliance electrical
plug, open the control chamber secured by the four
screws. Remove the sealing screw from the outlet
pressure tap with a 3/16" Hex Key Allen Wrench and
install a test tap and hose. Remove the cover cap
from the regulator screw with a straight slot screw-
driver through the top hole of the burner. (See Figure
33).
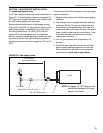
Turn on appliance gas valve and connect appliance
electrical plug. Ensure that the timer or thermostat, if
fitted, is set to call for heat. Switch on power at the
local switch. If necessary, the sequence as described
above, in the first and second paragraphs, should
take place. If not, refer to detailed fault finding
sequence. When flame is established, check the gas
pressure reading and adjust if necessary. See data
label or Page 8, Section 2, for required gas pressure
setting.
Check the gas pressure at the outlet of the gas valve
to ensure minimum pressure. See Page 8, Section
2.9, for required gas pressure settings.
Switch off the electrical supply (shutting down the
heater), remove pressure gauge and refit plug at out-
let pressure tap, ensuring a tight gas seal. Replace
cap and regulator screw. Close burner side cover.