


18
1
3
3
2
1
1
3
4
2
2
The heater should be serviced
annually only by an authorised person.
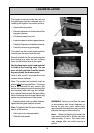
• GLASS REPLACEMENT AND
CLEANING. (May be performed by the
owner)
It is best to handle the glass with clean
gloves to avoid smearing the glass with
finger prints which might show after
replacement.
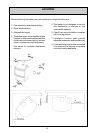
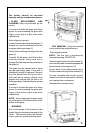
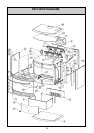
Refer diagram opposite
Loosen the side panel retaining screws.(1)
Access can now be obtained to the two
top glass retaining screws.(2)
Gently lift the retaining trim away from the
glass.(3)
Carefully lift the glass out of the bottom
retaining channel, taking care not to
damage the fiber seal on the perimeter of
the glass.(4)
The glass may be cleaned with a damp
sponge and soapy water. If the seal is
damaged it should be replaced. Remove
any soot deposit from the log set with a
soft brush and a vacuum cleaner. Soot
deposit may indicate that the flue is not
drawing properly. Check the flue for correct
operation.
It is best to handle the glass with clean
gloves to avoid smearing the glass with
finger prints which might show after
replacement.
NOTE: When replacing the glass make
sure that the joint of the fiber seal is at the
bottom of the glass.
• BURNERS
Due to the design of the burners in this
heater, they do not require cleaning by the
owner. The burners should be cleaned
once a year by a qualified service agent.
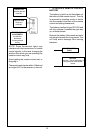
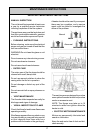
• FAN REMOVAL (Only to be carried
out by qualified service technician)
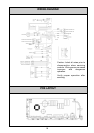
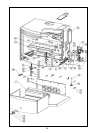
Refer diagram below
NOTE: The fan has a permanently
lubricated bearing. DO NOT OIL.
Open the right-hand panel of the heater (1)
and undo the cable connection between the
fan assembly and wiring loom.(2)
On the back of the heater loosen the 4
Phillips screws holding the fan bracket.(3)
The fan, complete with the fan support
bracket, can now be removed for cleaning
and replaced as is necessary.
Reassemble in reverse order.