


31
Inspection Procedures
Burners
Clean main burners and air louvers of dust, lint and
debris. Keep boiler area clear and free from com-
bustibles and flammable liquids. Do not obstruct the
flow of combustion and ventilation air. Make visual
check of burner and pilot flame. Yellow flame indicates
clogging of air openings. Lifting or blowing flame indi-
cates high gas pressure. Low flame indicates low gas
pressure.
Inspection Schedule
To be performed the first and third month after initial
start up and then on an annual basis. If problems are
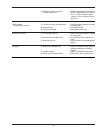
found, refer to Troubleshooting Guide for additional
directions.
1. Remove top of boiler and inspect heat exchanger
for soot and examine venting system.
2. Remove rear header and inspect for scale
deposits.
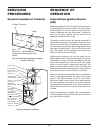
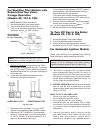
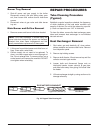
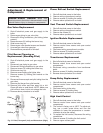
Fig. 33: Main Burner Flame
NOTE: Modulating burner flame varies in height from approximately
1/4" at low fire to approximately 4" in high fire.
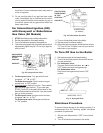
Fig. 34: Pilot Burner Flame (Standing Pilot Units)
*3. Inspect pilot and main burner flame and firing rate.
*4. Inspect and operate all controls and gas valve.
*5. Visually inspect system for water leaks.
*6. Inspect oil pump motor and bearing assembly, if oil
cups are provided.
7. Check flow switch paddle.
8. Clean room air intake openings to ensure ade-
quate flow of combustion and ventilation air.
9. Keep boiler area clear and free from combustible
materials, gasoline, and other flammable vapors
and liquids.
*Should be checked monthly. (Takes approximately 15
minutes).
Low Water Cut-Off (When Installed)
The low water cut-off automatically shuts down burner
whenever water level drops below probe. 90 second
time delay prevents premature lockout due to tempo-
rary conditions such as power failure or air pockets.
Flush float type devices at beginning of each heating
season.
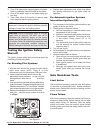
Procedure for Cleaning Flue Gas
Passageways
Soot will clog areas behind fins and eventually cause
tube failure. Any sign of soot at base of burners or
around outer jacket indicates a need for cleaning.
1. Lift off drafthood and flue collector by removing
bolts and screws.
2. Remove "V" baffles from heat exchanger.
3. Remove burner tray, see Burner Tray Removal.
4. Take garden hose and wash heat exchanger, mak-
ing sure soot is removed from between fins. (Avoid
excessive water against refractory).
5. Reassemble; when boiler is fired, some steam will
form from wet refractory. This is normal.
NOTE: In extreme cases it may be necessary to
remove the heat exchanger completely for cleaning.
The simplest method is steam cleaning at a local car
wash. DO NOT WIRE BRUSH!
CAUTION: Soot is combustible, so exercise
extreme care.