14 1-800-732-2677 (US), 1-800-457-3911 (Canada)
Training Guide
Be Patient With Your Pet
Important: Proper training of your pet is essential to the success of the PetSafe
®
In-Ground Radio
Fence
™
. Read this section completely before beginning to train your pet. Remember that the PetSafe In-
Ground Radio Fence is not a solid barrier.
• Have fun with your pet throughout the training process. Training should be fun, fair, firm and consistent.
• Train for 10 to 15 minutes at a time. Don’t try to do too much too quickly. More-frequent short sessions are
better than less-frequent longer sessions.
• If your pet shows signs of stress, slow down the training schedule, add additional days of training, or increase the
amount of play time with your pet in the Pet Area. Common stress signals include:
- Pet pulling on leash toward the house
- Ears tucked
- Tail down
- Body lowered
- Nervous / frantic movement or stiffening of pet’s body
• Your pet must be completely comfortable near the Boundary Flags at the end of every training session. Spend at
least 5 minutes of “play time” at the completion of each session within 10 feet of the Boundary Flags.
• Finish each training session on a positive note with lots of praise and play.
• Remove the Receiver Collar after each training session.
• Be sure to contain your pet by another means during the training period (e.g. pen, tie-out, leash, etc.).
• During training, if you need to take your pet out of the Pet Area, remove the Receiver Collar and either pick your
pet up or put him in the car to pass out of the Pet Area.
• Even if you think your pet is responding well to the training, complete the entire training. Reinforcement is important!
__________________________________________________
Day 1 - Boundary Flag Awareness
Perform three sessions on day 1, each training session lasting 10-15 minutes.
Goal:
To have your pet learn that the Boundary Flags, and warning beep and vibration from the Receiver Collar defi ne
the new Pet Area.
Setup:
• Program the Receiver Collar to level #2 or #3 depending on the size and temperament of your pet and place it on
your pet’s neck.
• Put a separate non-metallic collar on your pet’s neck ABOVE the Receiver Collar and attach a leash. Note: Be sure
the extra collar does not put pressure on the Contact Points.
• Have tiny pieces of treats that your pet will fi nd desirable available (hot dogs or lunch meat work well).
• Have your pet’s favorite play toy available.
Steps:
1. Begin by walking your pet on a leash in the Pet Area. Calmly praise and talk to your pet, occasionally giving treats.
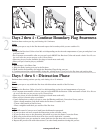
2. Move toward the Boundary Flags (10A). Keep your mood happy and throw treats to the ground.
3. With full control of your pet on a leash, toss a treat on the outside edge of the fl ags. As your pet enters the Static
Correction Zone to receive the treat, he will begin to receive a mild Static Correction (10B). The longer your pet
remains in the Static Correction Zone, the stronger the Static Correction will get. Allow him to stay in the Static
Correction Zone for 2 seconds then gently help your pet back into the Pet Area (10C). Immediately praise and offer
him a treat as he enters the Pet Area, even if you have helped with the leash. Wiggle a Boundary Flag to help your
pet understand that the discomfort of the Static Correction happens around the fl ags.
4. Repeat this process at several different Boundary Flags. Your pet should start to resist going after the treat in the
Static Correction Zone. If your pet continues to enter the Static Correction Zone, check the fi t of his Receiver
Collar and allow him 2-3 seconds in the zone before pulling him back to the Pet Area.
Note: Never allow your pet to eat the treat in the Static Correction Zone.
Phase
1


