


Pelco Manual C459M-E (1/96) 7
4.3 ENCLOSURE MOUNTING - PAN/TILT
The EH6500 Series Enclosure can be mounted to a pan/
tilt assembly in addition to a wall or pedestal/ceiling
mount.
To include the pan/tilt assembly in your configuration,
perform the following steps:
1. Select the appropriate mount (WM2000 with ST1
strut for wall mounting, PM2000/PM2010 for ped-
estal mounting) for the application.
NOTE: For maximum stability, use two (2)
ST1 struts.
2. Select the appropriate pan/tilt for the application.
Considerations must be made as to enclosure op-
tions, camera and lens selection, and environmen-
tal conditions. All of these will affect the pan/tilt
selection.
3. Secure the mount to a suitable load bearing sur-
face. Use fasteners with a minimum 1/4-inch di-
ameter.
4. Attach the pan/tilt to the mount. The pan/tilt con-
trol connector should be positioned towards the
building/mounting location. Note the “front” label
on the pan/tilt.
5. Install the camera/lens according to the instructions
in paragraph 4.2 of this manual.
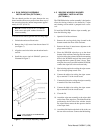
6. Balance the enclosure/camera/lens load on the tilt
table. Adjust the positioning as needed to align the
mounting holes. A minimum of two 1/4-20 x 5/8"
fasteners must be used. Secure the enclosure to the
tilt table.
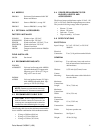
7. Make all necessary electrical connections. Be sure
to leave an adequate loop of cables between the
enclosure and the pan/tilt, and the enclosure and
the rigid mount to prevent binding and/or strain on
the cables (see Figures 5 and 6).
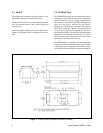
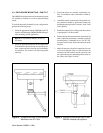
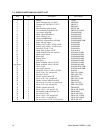
Figure 5 . Enclosure with Pan/Tilt and WM2000
Wall Mount with ST1 Strut
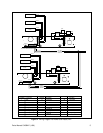
Figure 6. EH6500 Enclosure with Pan/Tilt and
PM2000 Pedestal/Ceiling Mount